The Channel Talk iOS SDK is a plugin facilitating the installation of real-time customer chat in applications written in Swift/Objc. If you're looking to install it into a web view or mobile web, please refer to the JavaScript SDK Installation Guide.
The minimum conditions of SDK are the following:
A Paid Channel Talk service plan.
Swift 5.0 and later
ChannelIO SDK 12.0.0 and later
Deployment target requirements:
SDK v12.4.1 and later require iOS 15 and above.
SDK v12.4.0 and earlier support iOS 12 and above.
You have the option to install the ChannelIO SDK using Swift Package Manager, CocoaPods, or Carthage.
The iOS SDK version 11.5.0 and higher includes a Privacy manifest (PrivacyInfo.xcprivacy). Use this version or higher if you require a Privacy manifest file.
You can use Swift Package Manager to install ChannelIO SDK. make sure you have Xcode 11 or a more recent version.
Navigate to the Xcode Navigator, select the project where you want to install the package, and then choose the Swift Package tab. Finally, click the
+button.

Add the ChannelIO Swift package repository URL. Once you've set the version, click the
Add Packagebutton.
https://github.com/channel-io/channel-talk-ios-framework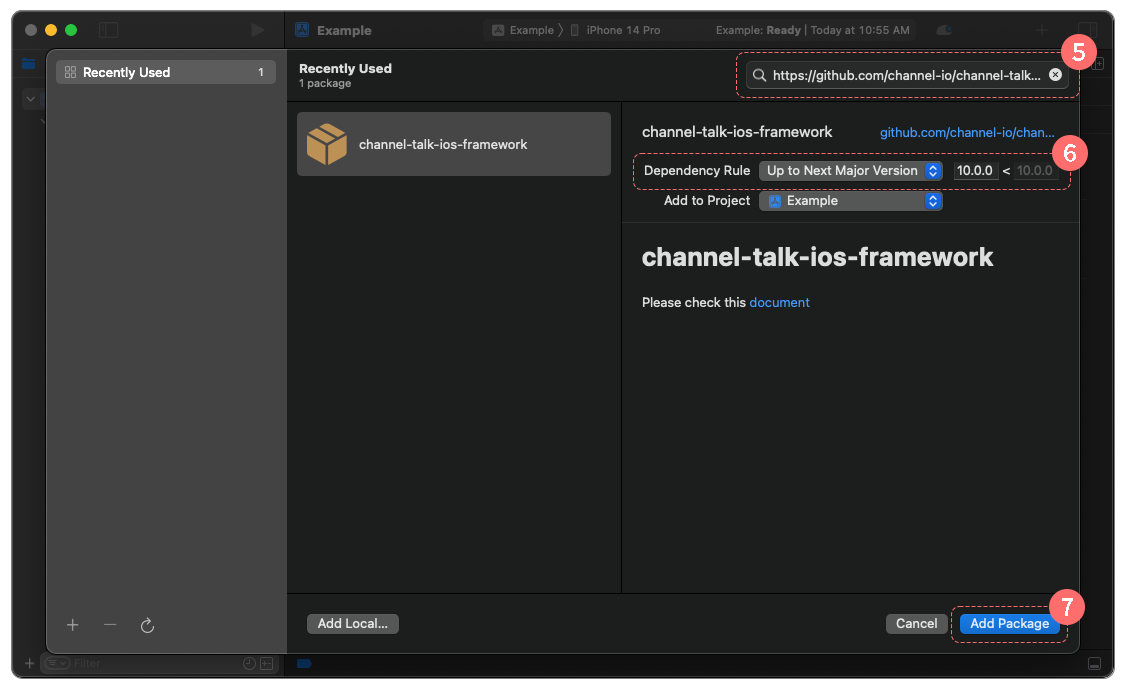
You can utilize CocoaPods to install the ChannelIO SDK. Please ensure that you have CocoaPods version 1.10.0 or later.
Add ChannelIOSDK to the 'Podfile' of your project as shown below:
If you require a specific package version, modify the 'latest' in the script to the desired version. For example:
Run the
pod installcommand in the directory where the 'Podfile' is located to install the package.Open
Project_Name.xcworkspace
You can utilize Carthage to install ChannelIO SDK.
Add ChannelIOSDK to the
Cartfileof your project as below.
binary "https://mobile-static.channel.io/ios/latest/channeliosdk-ios.json"If you need to install a specific package version, modify the script as follows:
// Compatible version
binary "https://mobile-static.channel.io/ios/latest/channeliosdk-ios.json" ~> 8.0.0
// Specific version
binary "https://mobile-static.channel.io/ios/latest/channeliosdk-ios.json" == 8.0.0
Run the
carthage updatecommand in the directory where theCartfileis located to install the package. For instance:
carthage update --platform iOS --use-xcframeworksThe ChannelIO package is built inside the
PROJECT_DIR/Carthage/builddirectory. Drag this package to Xcode to add it.
To utilize the SDK, certain permissions are necessary. Please incorporate the corresponding key-value pairs and descriptions into your project's info.plist.
Key | Value |
|---|---|
Privacy-Camera Usage Description | Accessing to the camera in order to provide a better user experience |
Privacy-Photo Library Additions Usage Description | Accessing to photo library in order to save photos |
Privacy-Microphone Usage Description | Accessing to microphone to record voice for video |
If your SDK version is below 10.0.7, or if the minimum deployment target version of your app is less than iOS 13.0, you will need to add the following permission additionally.
Key | Value |
|---|---|
Privacy-Photo Library Usage Description | Accessing to photo library in order to provide a better user experience |
Import the SDK where you need to use it.
import ChannelIOFront#import <ChannelIOFront/ChannelIOFront-swift.h>You need to initialize for using SDK before using it. add the initialize method below in the application(_:didFinishLaunchingWithOptions) in the AppDelegate.swift.
If you manage app’s window on SceneDelegate.swift, add the initializeWindow method below in the scene(_:willConnectTo:options:).
Boot is the preliminary process for utilizing the SDK.
You will require your channel's plugin key. Refer to how to get a plugin key. There are two types of Boot: Boot as an anonymous user or Boot as a member user
For a comprehensive description of the user, refer to Member User.
An anonymous user refers to a user without a memberId. Here's an example of booting with an anonymous user and receiving the result value of the boot process.
Boot's method parameter, CHTBootConfig, provides several boot options, including pluginKey.
A member user is a user with a memberId. If the user can be identified on its own, such as when signed into your service, you can initiate a boot process as a member user by providing a memberId. The Channel distinguishes a user by the memberId field.
Additional information can be injected into users using the CHTProfile .
Use member hash to protect sensitive information of your users
you set the memberId using predictable values such as user ID or email, an unauthorized third party might obtain your user’s memberId. This unauthorized access might allow the malicious third party to access your user’s sensitive information, including mobile numbers and chat logs, leading to a security breach. Enable the member hash for your channel to enhance the security level.
Below is an example of Boot a member user with a specific MEMBER_ID.
The information of the same person can be unified
When booting as a member user from an anonymous user state, users can be unified into one if Channel finds a strong evidence that the two users are the same person. See unifying customer information for details.
Boot requires a network connection, which may introduce some random delays. BootCallback can be used if there is a task to be processed after the boot is completed or fails.
See CHTBootStatus for the full list of boot results.
Caution When Using BootStatus
Do not selectively call functions that display the SDK screen, such as ChannelIO.showMessenger or ChannelIO.showChannelButton, by checking the boot status (BootStatus).
The SDK internally checks the boot status for these features. As of version 12.14.0, the SDK automatically provides an appropriate guidance screen to your users if the current SDK version is no longer supported due to a future update. If you selectively call these functions, this necessary user experience will not be provided, which can disrupt the experience for customers using unsupported versions.
SDK provides a default Channel button to launch messengers. You can call showChannelButton and hideChannelButton to show or hide Channel buttons.
If you want to change the appearance of the button, refer to how to customize the Channel button.
All features except event tracking and push notifications will stop working. Chat and marketing popups will not be shown.
Terminates all features of the SDK. If you want to use the feature of SDK again, you may need to Boot again.