
이 문서는 ChannelIO React Native SDK (이하 SDK)의 푸시 알림에 대해 서술한 문서입니다.
iOS
이 단락에서는 iOS 환경에서 SDK의 푸시 알림을 지원하는 방법에 대해서 설명합니다.
Step 1. APNs 인증 정보 설정하기
APNs 인증 정보 설정은 iOS 네이티브의 설정 방식과 동일합니다. iOS의 푸시 알림 설정 을 참고하여 설정합니다.
Step 2. React Native에서 설정하기
설정하기 이전에, facebook의 PushNotificationiOS 를 설치했는지 확인합니다. 만약 설치하지 않은 경우에는 PushNotification repository를 참고하여 설치 후 다음 절차를 진행합니다.
Request permission
푸시 알림 권한을 요청합니다.
import PushNotificationIOS from "@react-native-community/push-notification-ios";

PushNotificationIOS.requestPermissions();
Register token
deviceToken을 획득하고, 채널에 PushToken 이 변경됨을 알립니다.
import PushNotificationIOS from "@react-native-community/push-notification-ios";
import { ChannelIO } from 'react-native-channel-plugin';

PushNotificationIOS.addEventListener('register', (token) => {
  ChannelIO.initPushToken(token);
});
Handle push notification
채널톡에 유저가 푸시 알림을 받았음을 전달합니다.
import PushNotificationIOS from "@react-native-community/push-notification-ios";
import { ChannelIO } from 'react-native-channel-plugin';

PushNotificationIOS.addEventListener('notification', (notification) => {
  ChannelIO.isChannelPushNotification(notification.getData()).then((result) => {
    if (result) {
      ChannelIO.receivePushNotification(notification.getData()).then((_) => {
        notification.finish(PushNotificationIOS.FetchResult.NoData);
      })
    } else {
      //other push logics goes here
      notification.finish(PushNotificationIOS.FetchResult.NoData);
    }
  })
});
Step 3. iOS 코드에서 푸시 알림 처리하기
iOS 프로젝트에 푸시 알림 처리를 위해 다음과 같은 설정을 추가합니다.
아래 가이드는 React-native-official-guide를 따릅니다.
Swift
AppDelegate.swift
import UserNotifications
import RNCPushNotificationIOS
...

class AppDelegate: UIResponder, UIApplicationDelegate, RCTBridgeDelegate, UNUserNotificationCenterDelegate {
    ...
    func application(_ application: UIApplication, didFinishLaunchingWithOptions launchOptions: [UIApplication.LaunchOptionsKey: Any]?) -> Bool {
        ...
        UNUserNotificationCenter.current().delegate = self
        UNUserNotificationCenter.current().requestAuthorization(options: [.alert, .sound, .badge]) { granted, error in
            if granted {
                DispatchQueue.main.async {
                    application.registerForRemoteNotifications()
                }
            }
        }
        return true
    }
    ...
    func application(_ application: UIApplication, didRegisterForRemoteNotificationsWithDeviceToken deviceToken: Data) {
        RNCPushNotificationIOS.didRegisterForRemoteNotifications(withDeviceToken: deviceToken)
    }

    func application(_ application: UIApplication, didFailToRegisterForRemoteNotificationsWithError error: Error) {
        RNCPushNotificationIOS.didFailToRegisterForRemoteNotificationsWithError(error)
    }

    func userNotificationCenter(_ center: UNUserNotificationCenter, willPresent notification: UNNotification, withCompletionHandler completionHandler: @escaping (UNNotificationPresentationOptions) -> Void) {
        completionHandler([.banner, .sound, .badge])
    }

    func userNotificationCenter(_ center: UNUserNotificationCenter, didReceive response: UNNotificationResponse, withCompletionHandler completionHandler: @escaping () -> Void) {
        RNCPushNotificationIOS.didReceiveRemoteNotification(response.notification.request.content.userInfo)
        let userInfo = response.notification.request.content.userInfo
        if ChannelIO.isChannelPushNotification(userInfo) {
            ChannelIO.receivePushNotification(userInfo)
            ChannelIO.storePushNotification(userInfo)
        }
        completionHandler()
    }
    ...
}
Objective-C
AppDelegate.h
UNUserNotificationCenter 를 채택합니다.
#import <UserNotifications/UNUserNotificationCenter.h>
...

@interface AppDelegate : UIResponder <UIApplicationDelegate, RCTBridgeDelegate, UNUserNotificationCenterDelegate>

...
AppDelegate.m
AppDelegate 구현채를 아래를 참고하여 수정합니다.
#import <UserNotifications/UserNotifications.h>
#import <RNCPushNotificationIOS.h>

- (BOOL)application:(UIApplication *)application didFinishLaunchingWithOptions:(NSDictionary *)launchOptions
{
...
  [ChannelIO initialize:application]
  UNUserNotificationCenter *center = [UNUserNotificationCenter currentNotificationCenter];
  center.delegate = self;

 ....
}

//Called when a notification is delivered to a foreground app.
-(void)userNotificationCenter:(UNUserNotificationCenter *)center willPresentNotification:(UNNotification *)notification withCompletionHandler:(void (^)(UNNotificationPresentationOptions options))completionHandler
{
  completionHandler(UNAuthorizationOptionSound | UNAuthorizationOptionAlert | UNAuthorizationOptionBadge);
}

// Required to register for notifications
- (void)application:(UIApplication *)application didRegisterUserNotificationSettings:(UIUserNotificationSettings *)notificationSettings
{
 [RNCPushNotificationIOS didRegisterUserNotificationSettings:notificationSettings];
}
// Required for the register event.
- (void)application:(UIApplication *)application didRegisterForRemoteNotificationsWithDeviceToken:(NSData *)deviceToken
{
 [RNCPushNotificationIOS didRegisterForRemoteNotificationsWithDeviceToken:deviceToken];
}

// Required for the registrationError event.
- (void)application:(UIApplication *)application didFailToRegisterForRemoteNotificationsWithError:(NSError *)error
{
 [RNCPushNotificationIOS didFailToRegisterForRemoteNotificationsWithError:error];
}
아래 예시는 앱이 백그라운드에 있거나, 종료되어 있는 경우 채널톡 푸시 알림을 처리합니다. AppDelegate.m에 추가합니다.
- (void)userNotificationCenter:(UNUserNotificationCenter *)center
  didReceiveNotificationResponse:(UNNotificationResponse *)response
  withCompletionHandler:(void (^)(void))completionHandler
{
  NSDictionary *userInfo = response.notification.request.content.userInfo;
    if ([ChannelIO isChannelPushNotification:userInfo]) {
        [ChannelIO receivePushNotification:userInfo completion: nil];
        [ChannelIO storePushNotification: userInfo];
    }
    completionHandler();
}
Step 4. 채널톡 채팅 열기
유저가 채널톡 푸시 알림을 받고, 푸시 알림을 탭해서 앱에 진입했을 때 해당 메시지를 열어주고 싶은 경우에는, App.js 의 componentDidMount() 메소드에 아래 예시를 추가합니다.
import { ChannelIO } from 'react-native-channel-plugin';

componentDidMount() {
    ChannelIO.hasStoredPushNotification().then((result) => {
    if (result) {
      ChannelIO.openStoredPushNotification()
    }
  })
}
설치하고 나
Notification Extension
이 Extension은 앱의 background 또는 terminated 상태에서도 채널톡 푸시에 대한 응답을 정상적으로 보낼 수 있도록 합니다.
채널톡은 이 Extension을 추가하기를 권장합니다. 만약 이를 추가하지 않은 경우에는, 팔로업 문자와 푸시 알림이 모두 도착할 수 있습니다. iOS Notification Extension 문서를 참고하여 설치합니다.
Android
이 단락에서는 Android 환경에서 SDK의 푸시 알림을 지원하는 방법에 대해서 설명합니다.
API level 33(Tiramisu) 이상에서 시스템 푸시 알림을 표시하고자 하는 경우 POST_NOTIFICATIONS 권한이 필요합니다.
채널톡 안드로이드 SDK는 직접 POST_NOTIFICATIONS 권한을 요청하지 않으므로 앱에 해당 권한이 있는지 확인해야 합니다. 자세한 사항은 알림에 관한 안드로이드 공식 문서를 확인합니다.
Step 1. Firebase 프로젝트 생성하기
- Firebase 설치 가이드에 따라 안드로이드 앱 프로젝트를 설정합니다.
google-service.json파일을 다운로드 받아서 안드로이드 앱 모듈 단위의 최상위 디렉토리에 복사합니다.
Step 2. Firebase와 채널톡 데스크 연동하기
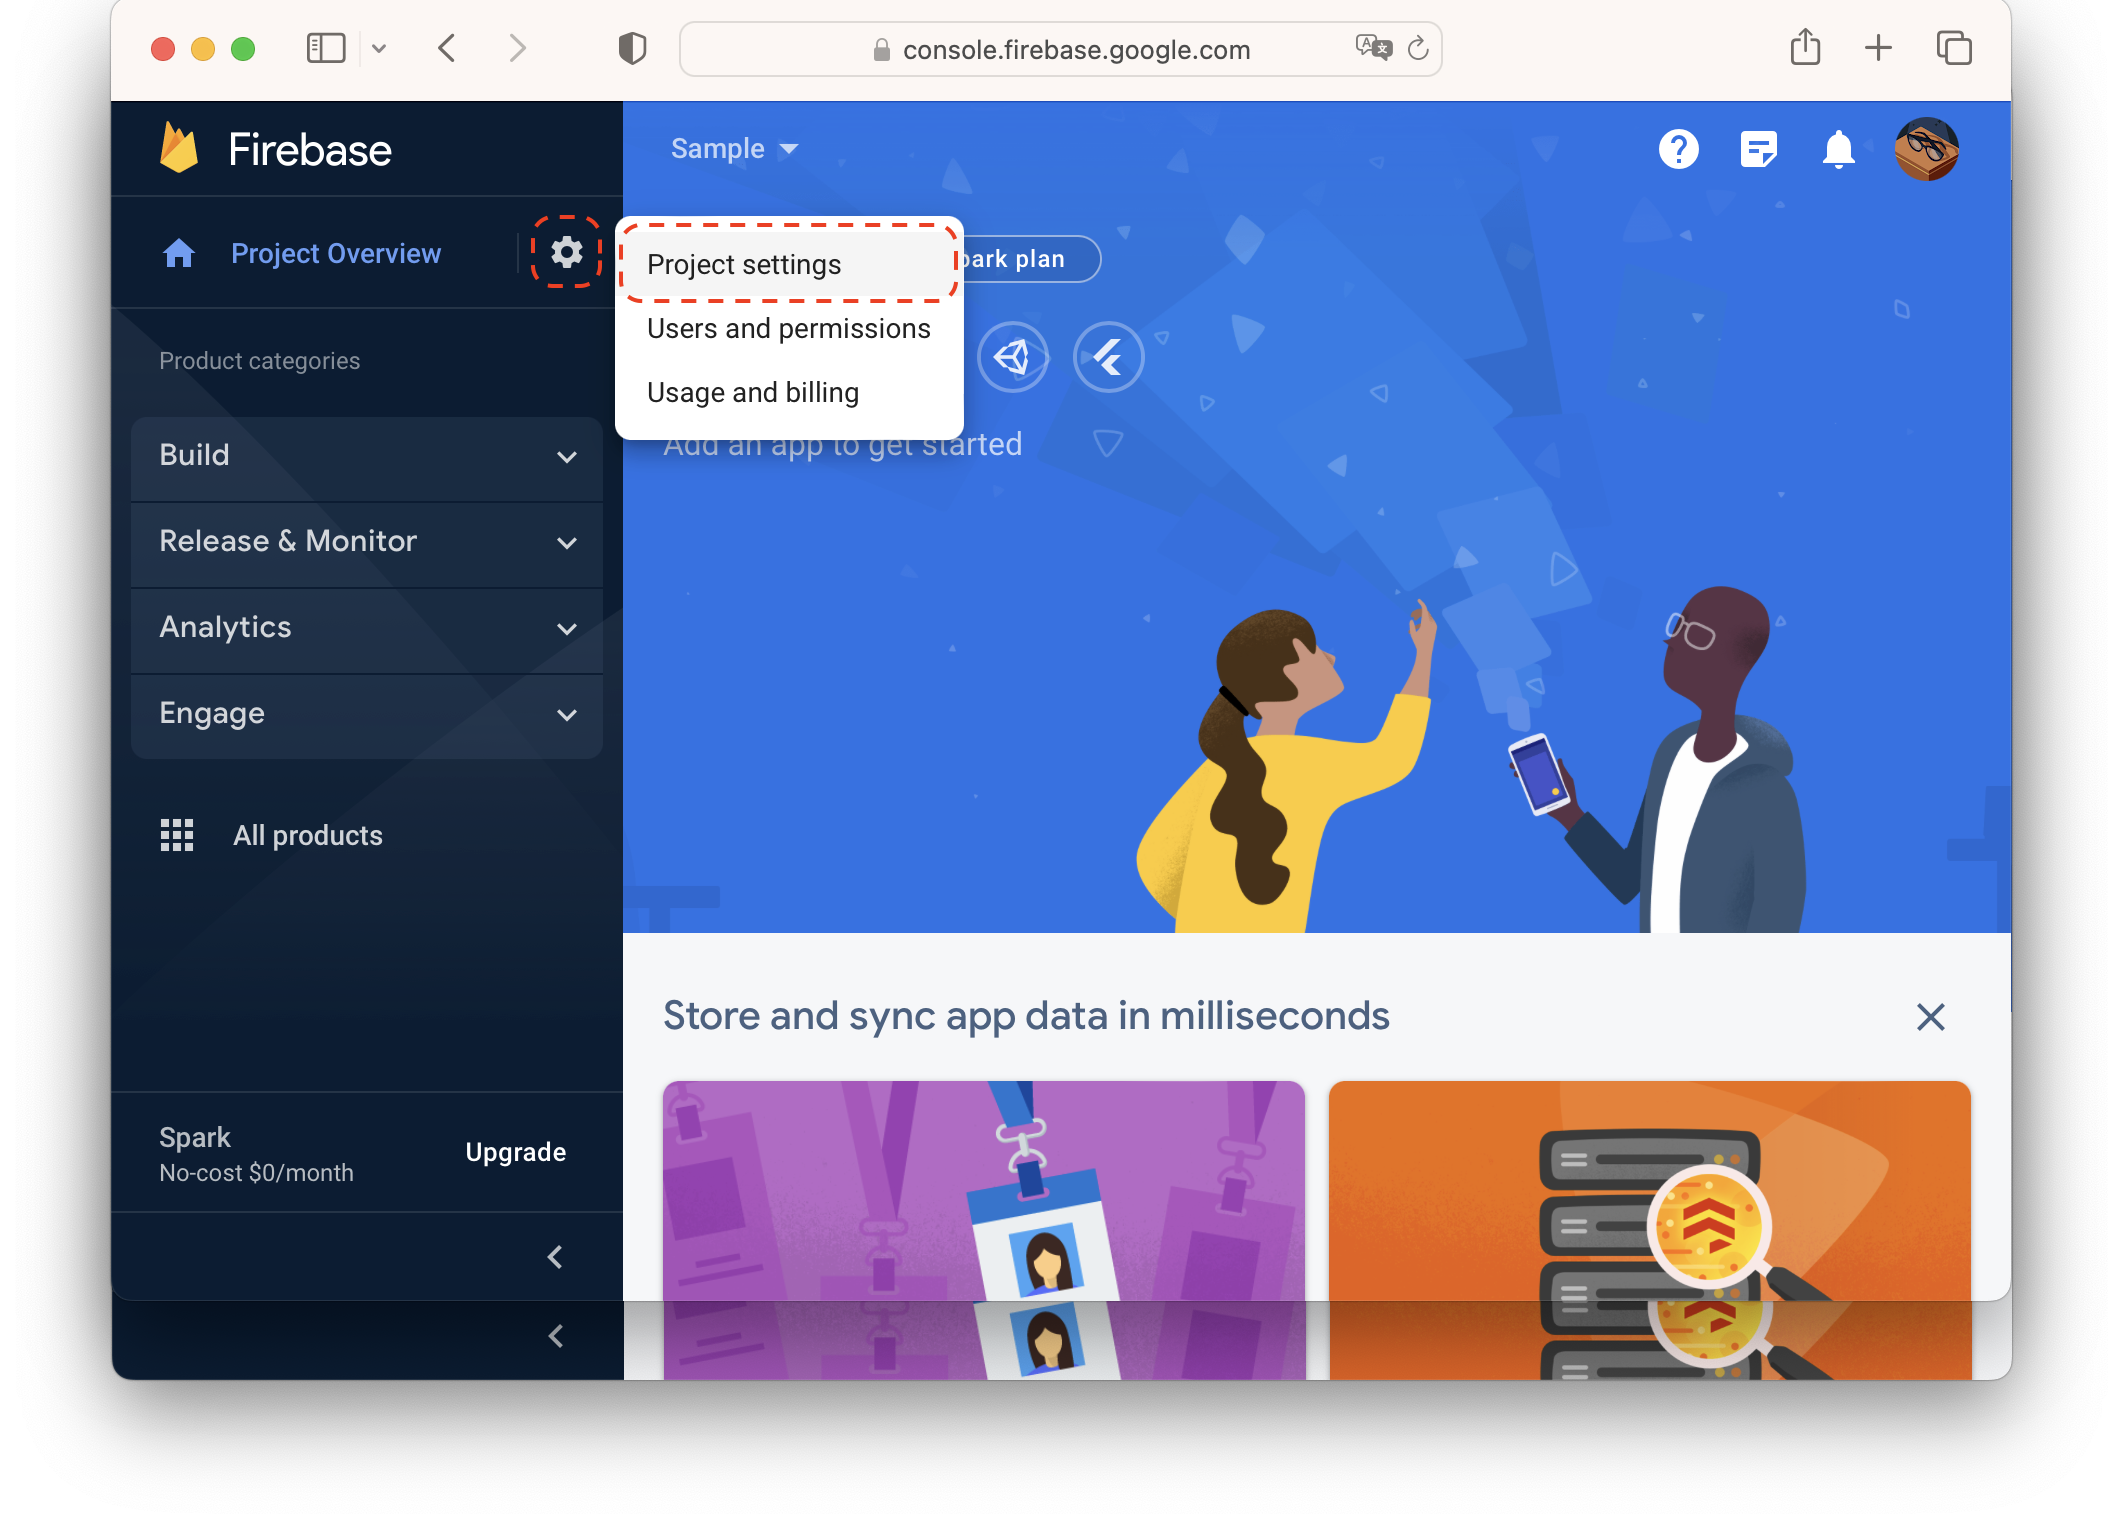
- Firebase 콘솔에서 왼쪽 사이드바의 프로젝트 오버뷰 > 프로젝트 설정을 클릭합니다.
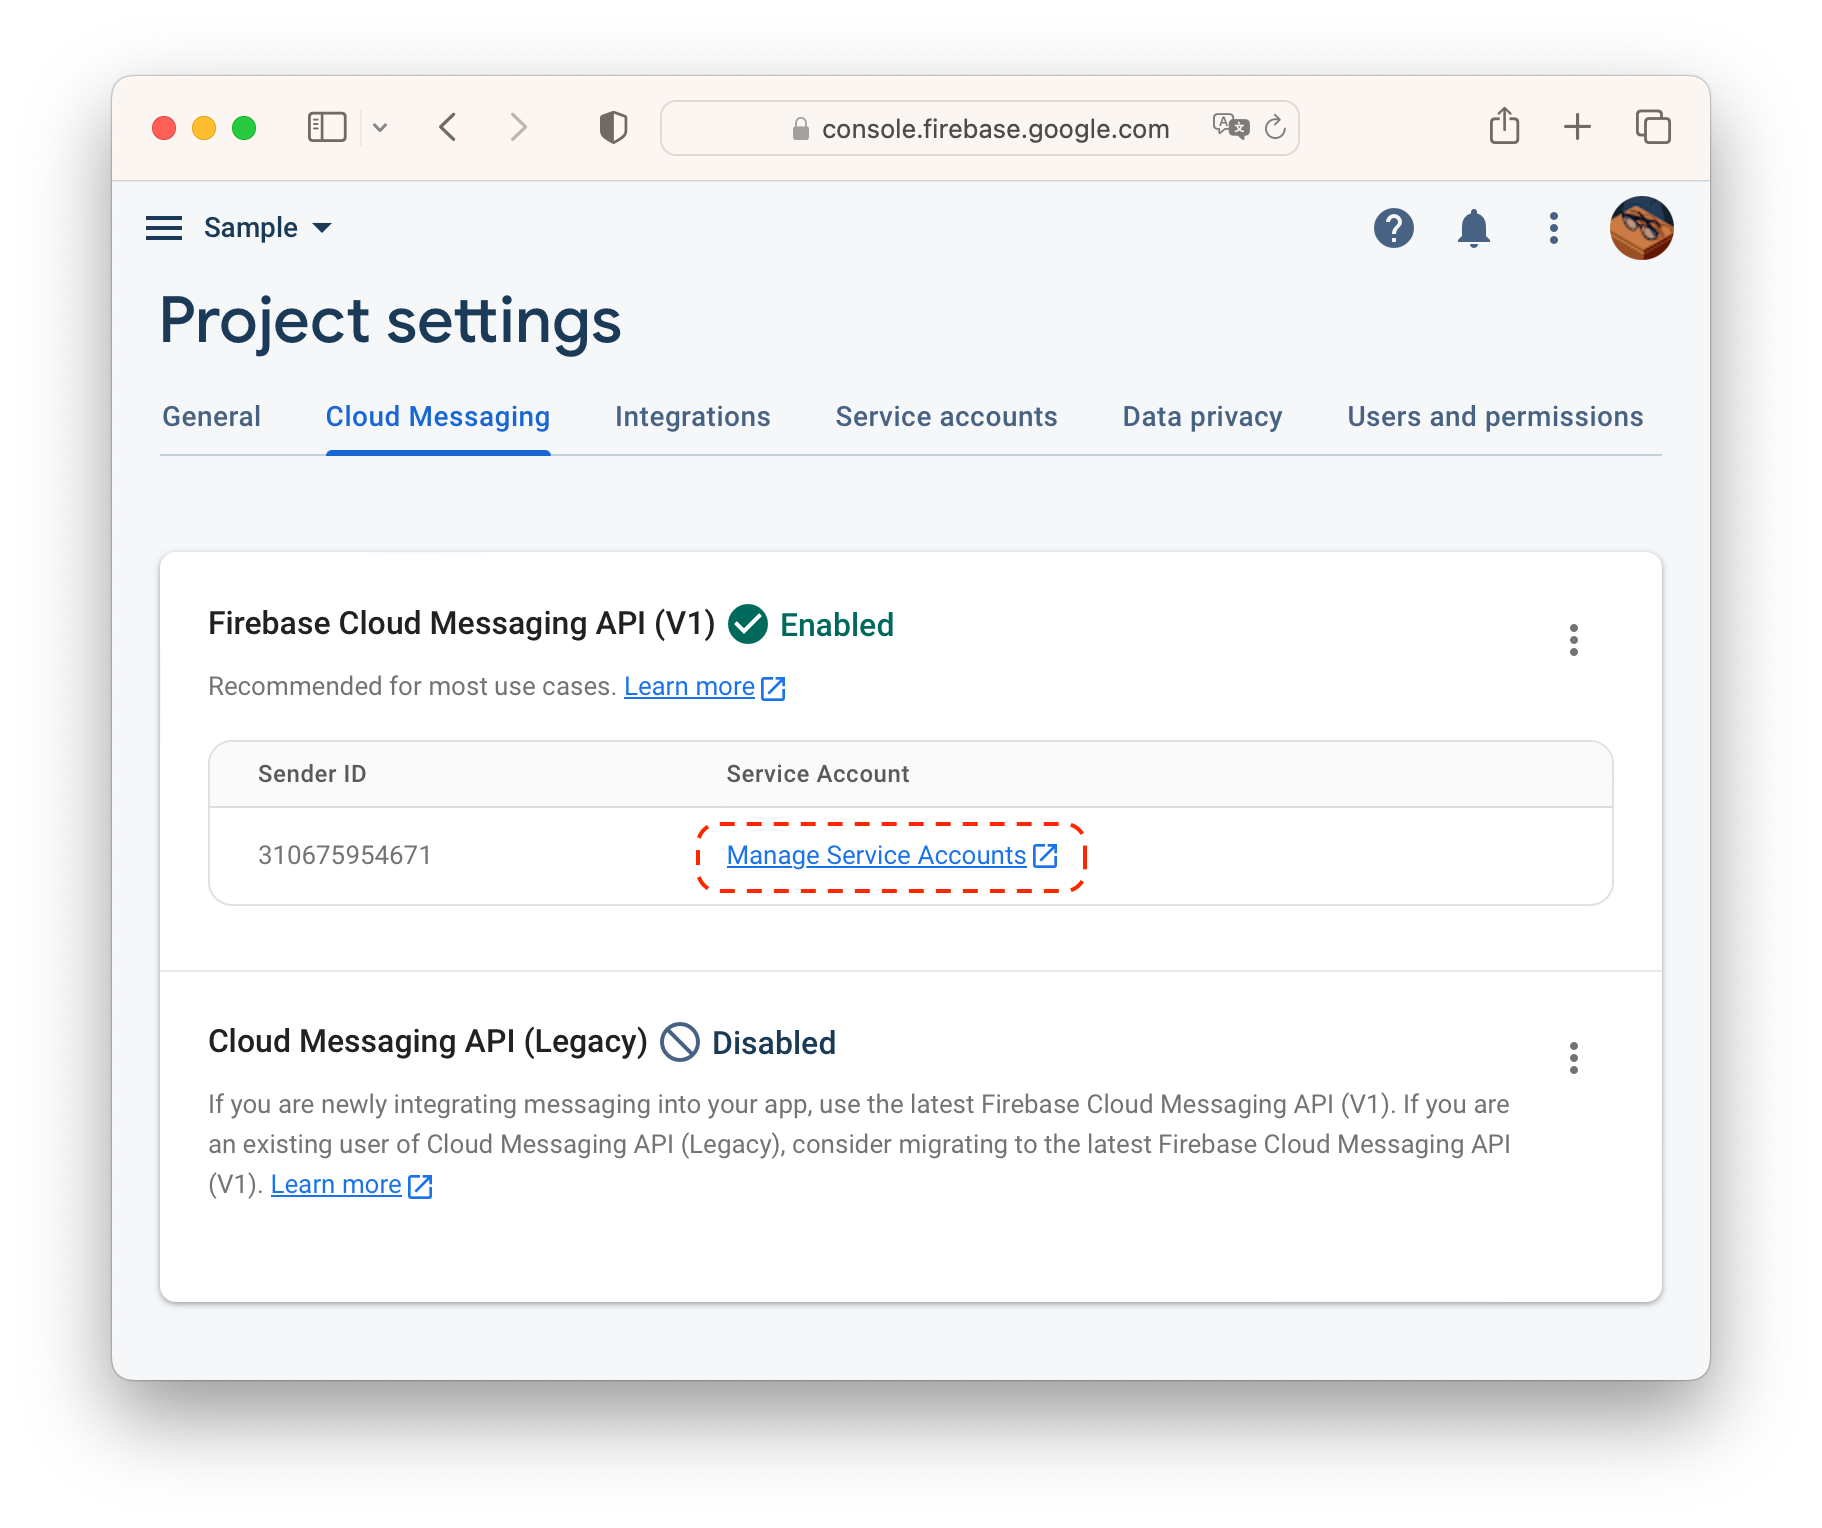
- Cloud Messaging 탭으로 이동해서 Firebase Cloud Messaging API(V1) 섹션에 있는 서비스 계정 관리(Manager Service Accounts)를 클릭합니다.
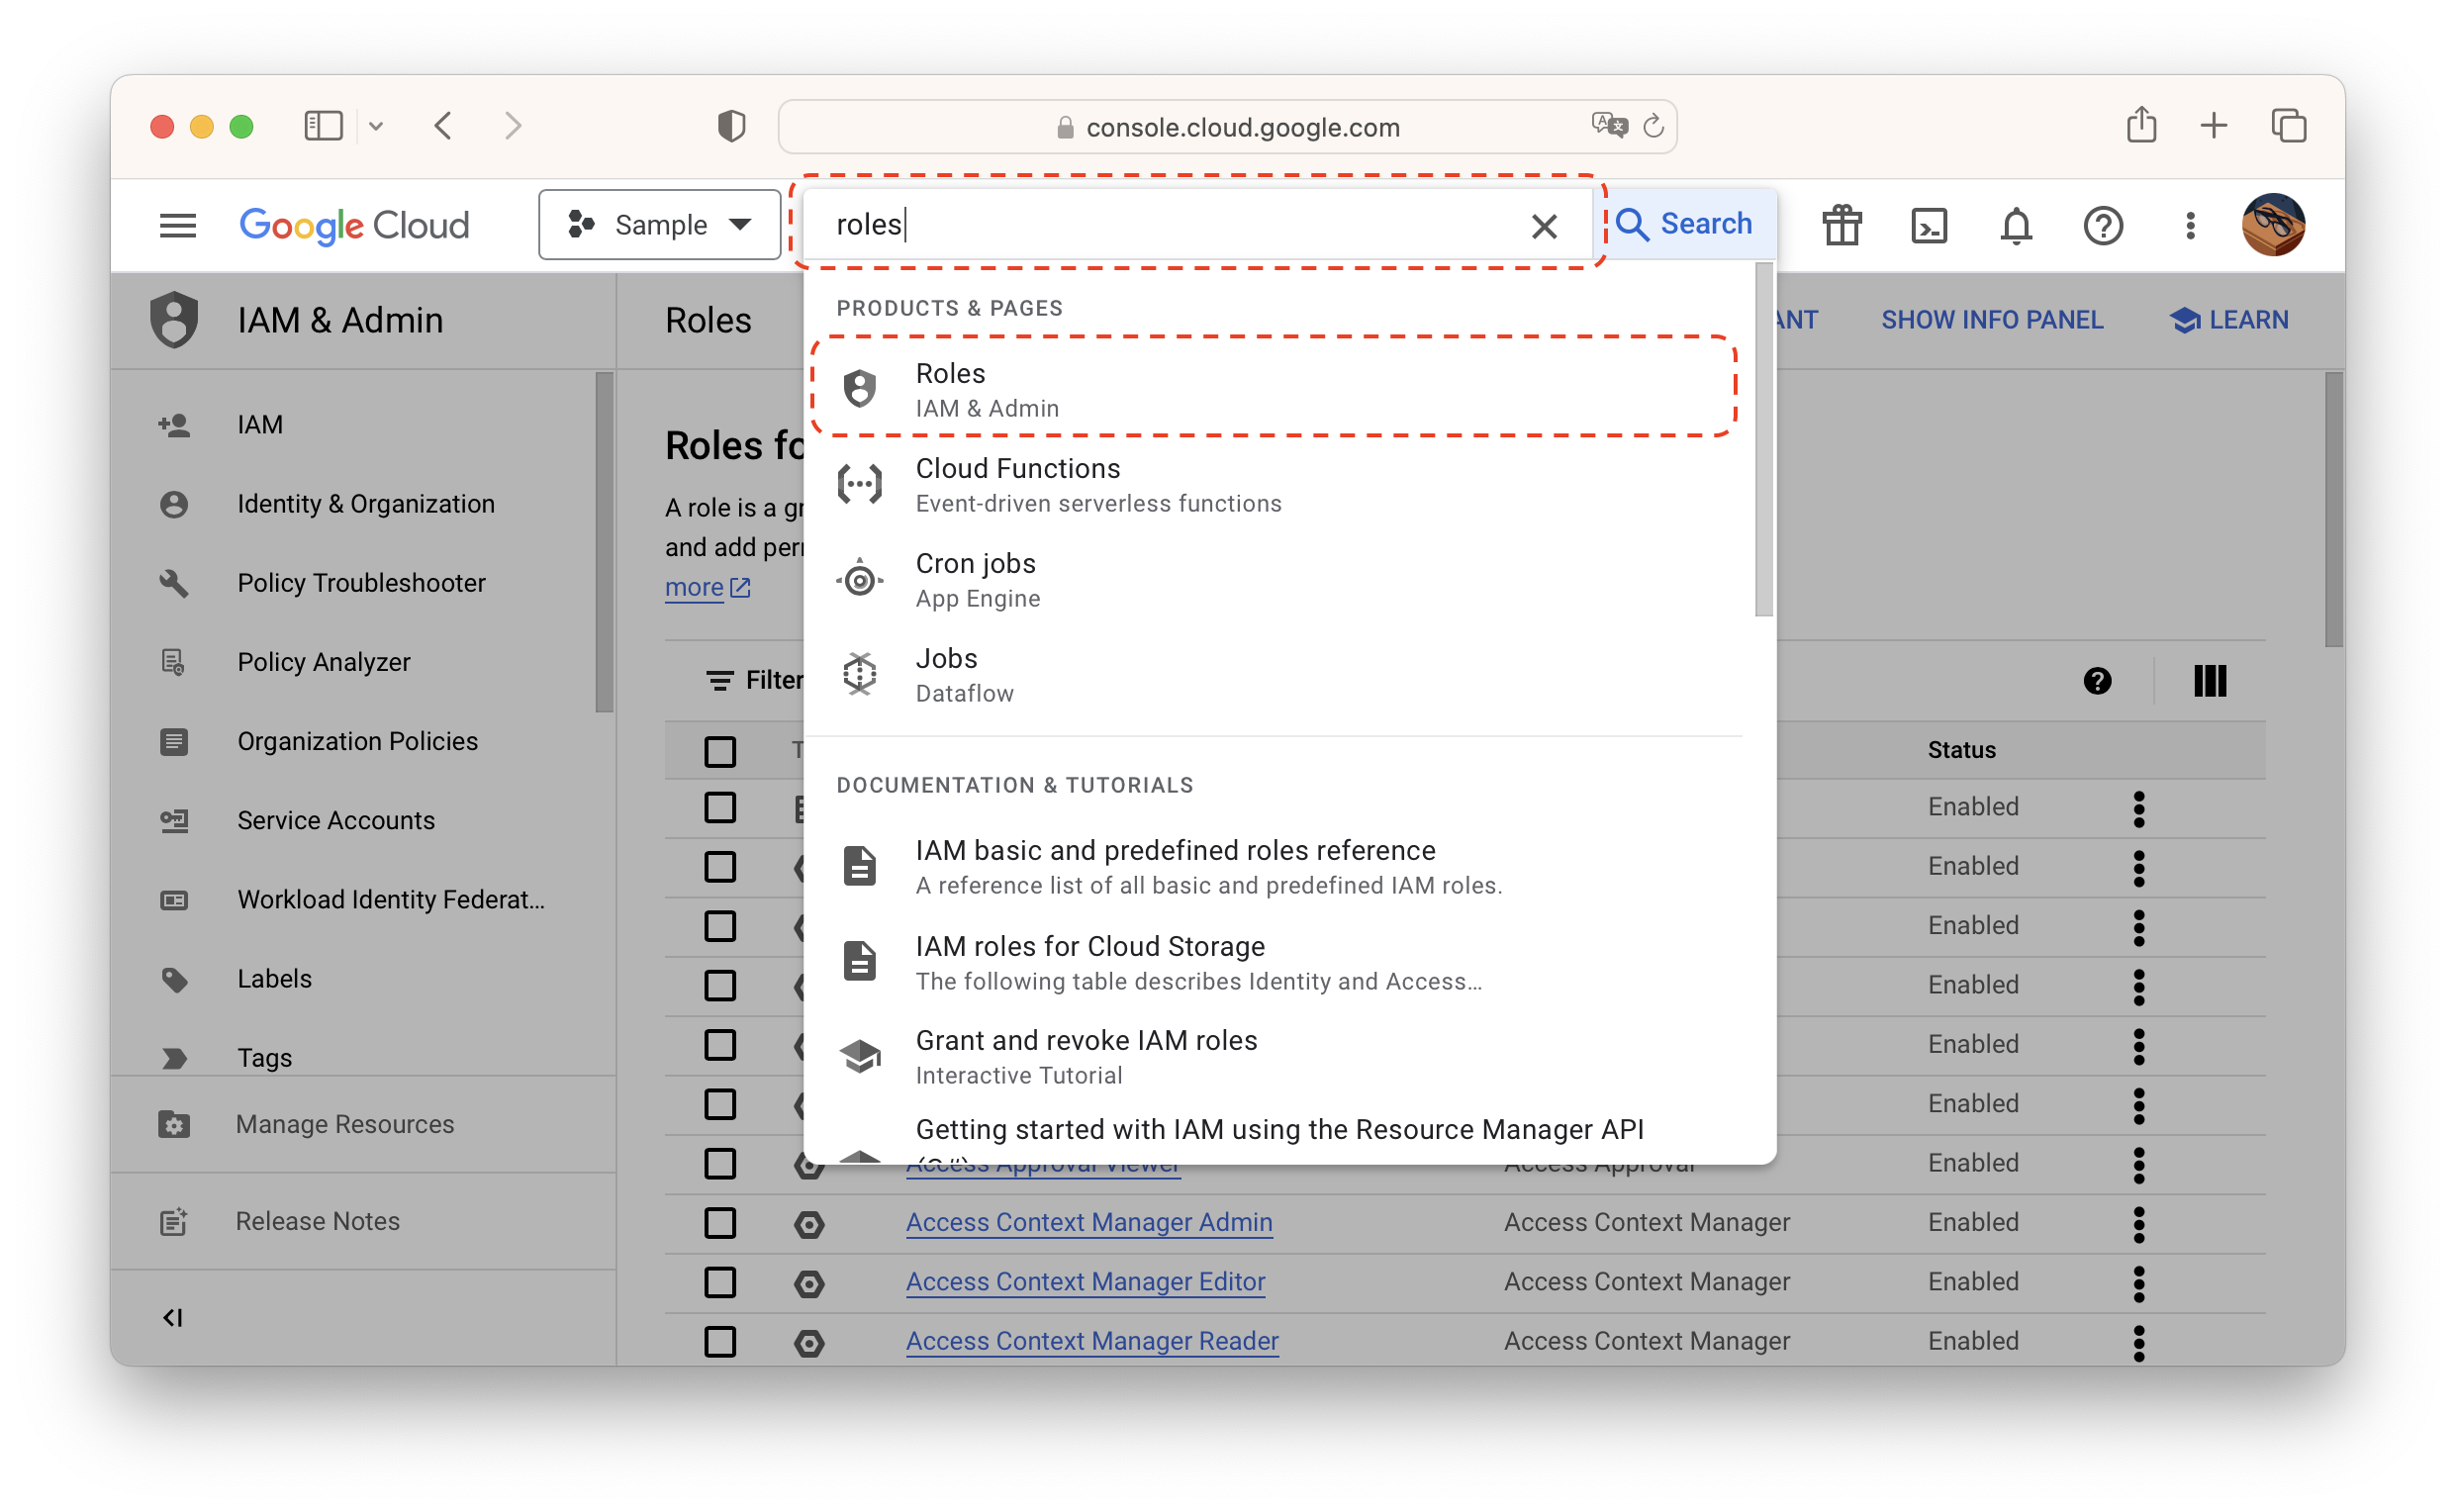
- 서비스 계정을 만들기 이전에 먼저 역할을 만들어야 합니다. 역할 관리(Roles) 페이지로 이동합니다.
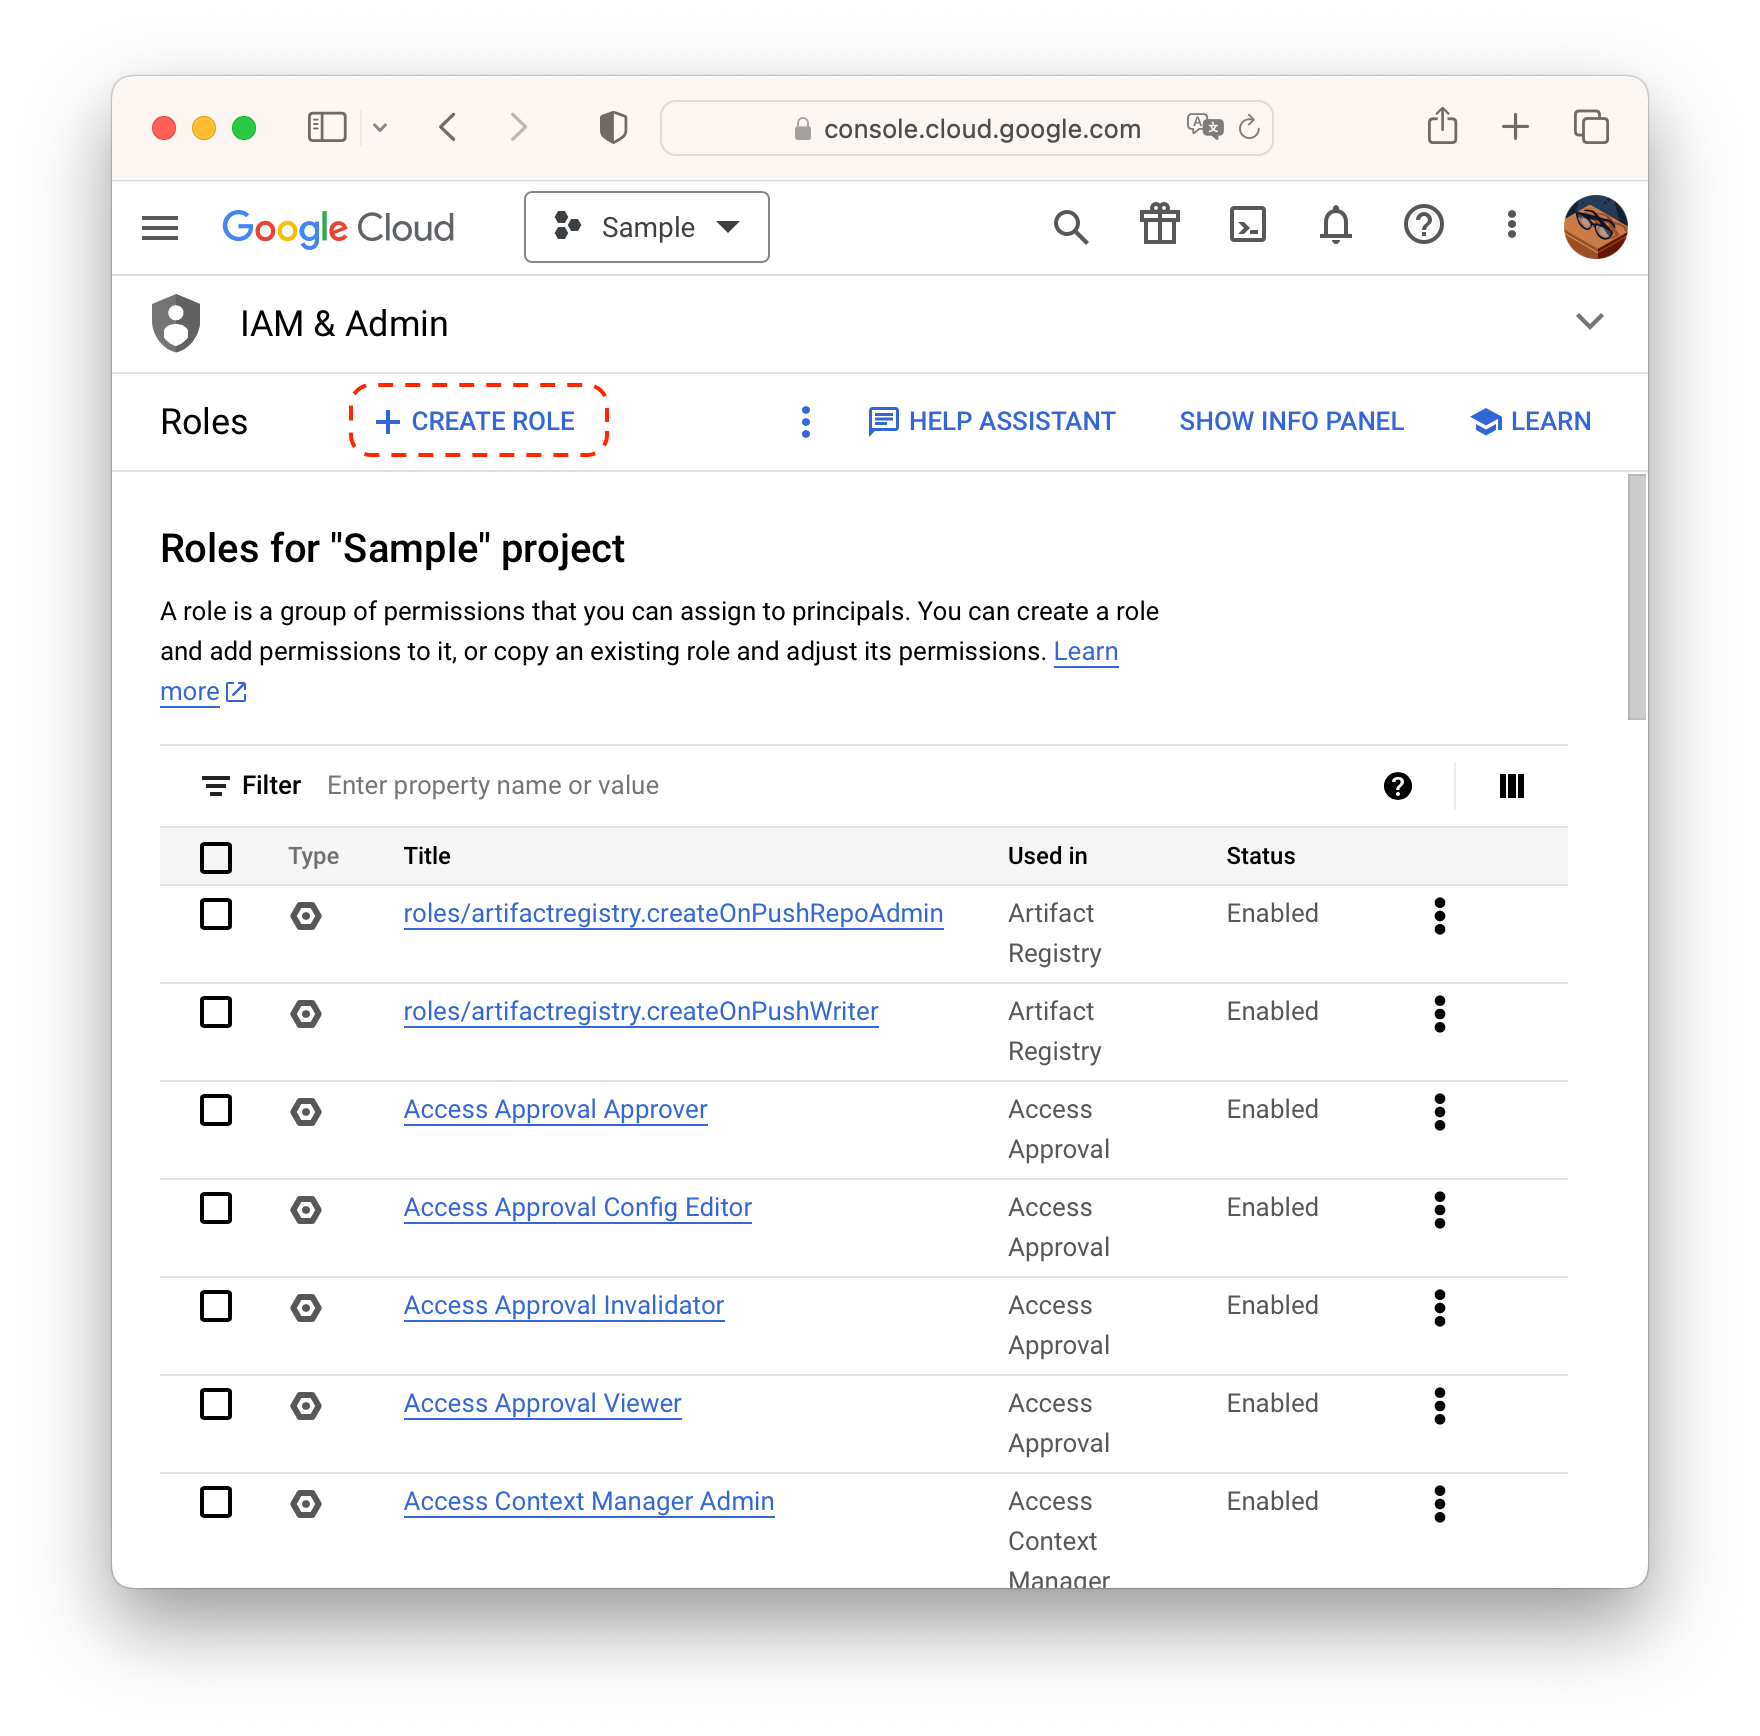
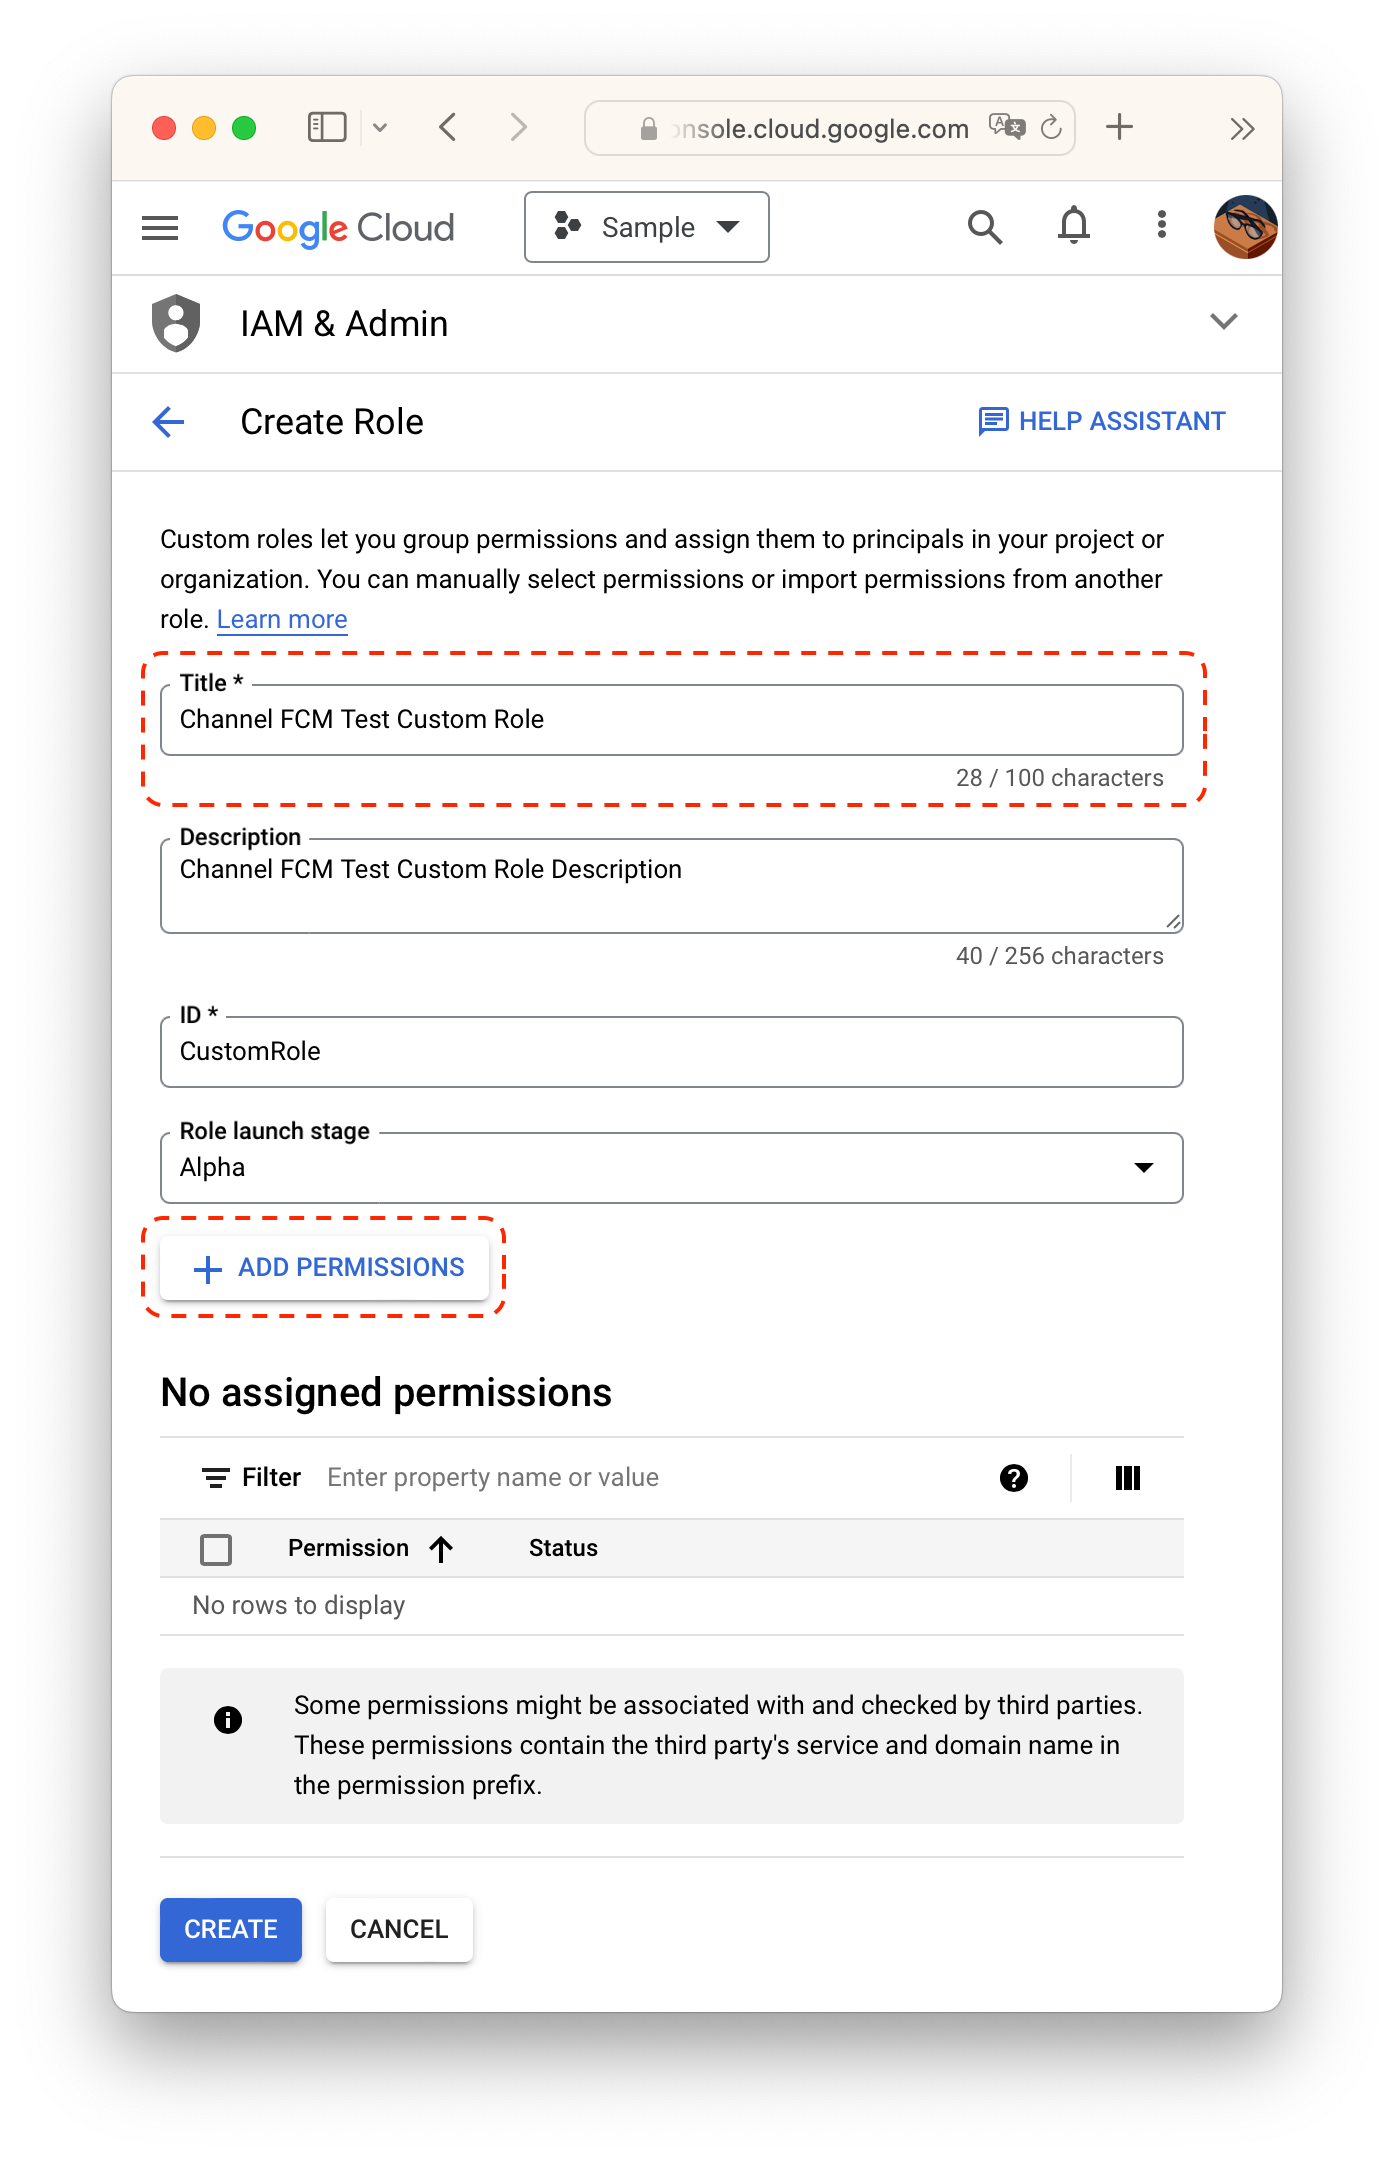
- 역할 만들기(CREATE ROLE)를 클릭합니다.
- 커스텀 역할 제목을 넣고, 권한 추가(ADD PERMISSIONS)를 클릭합니다.
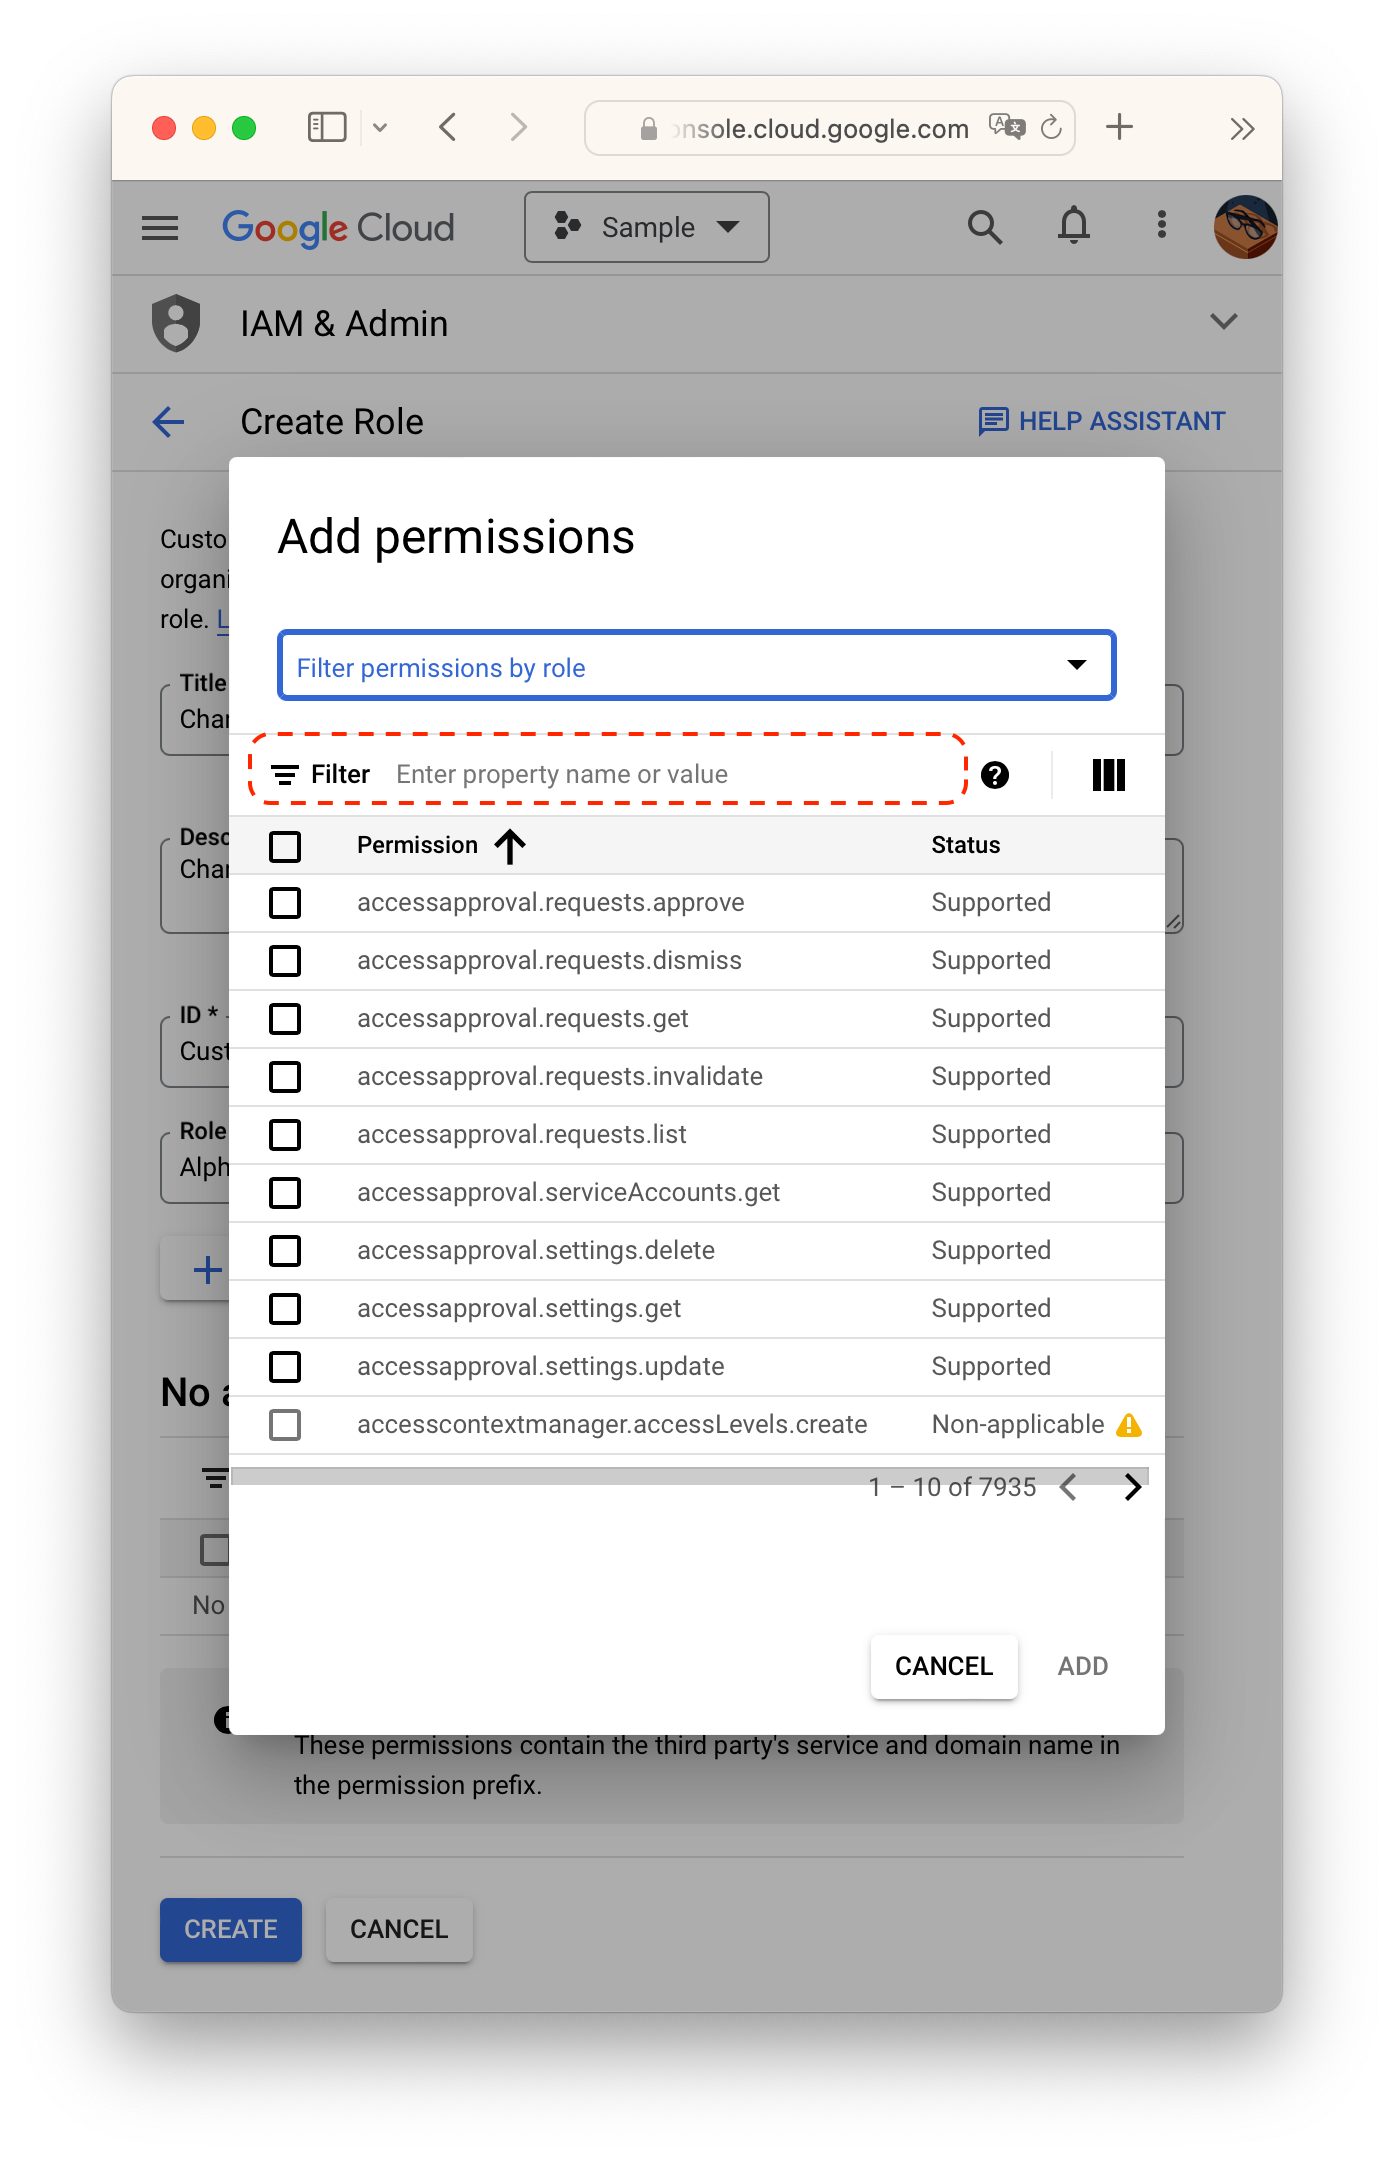
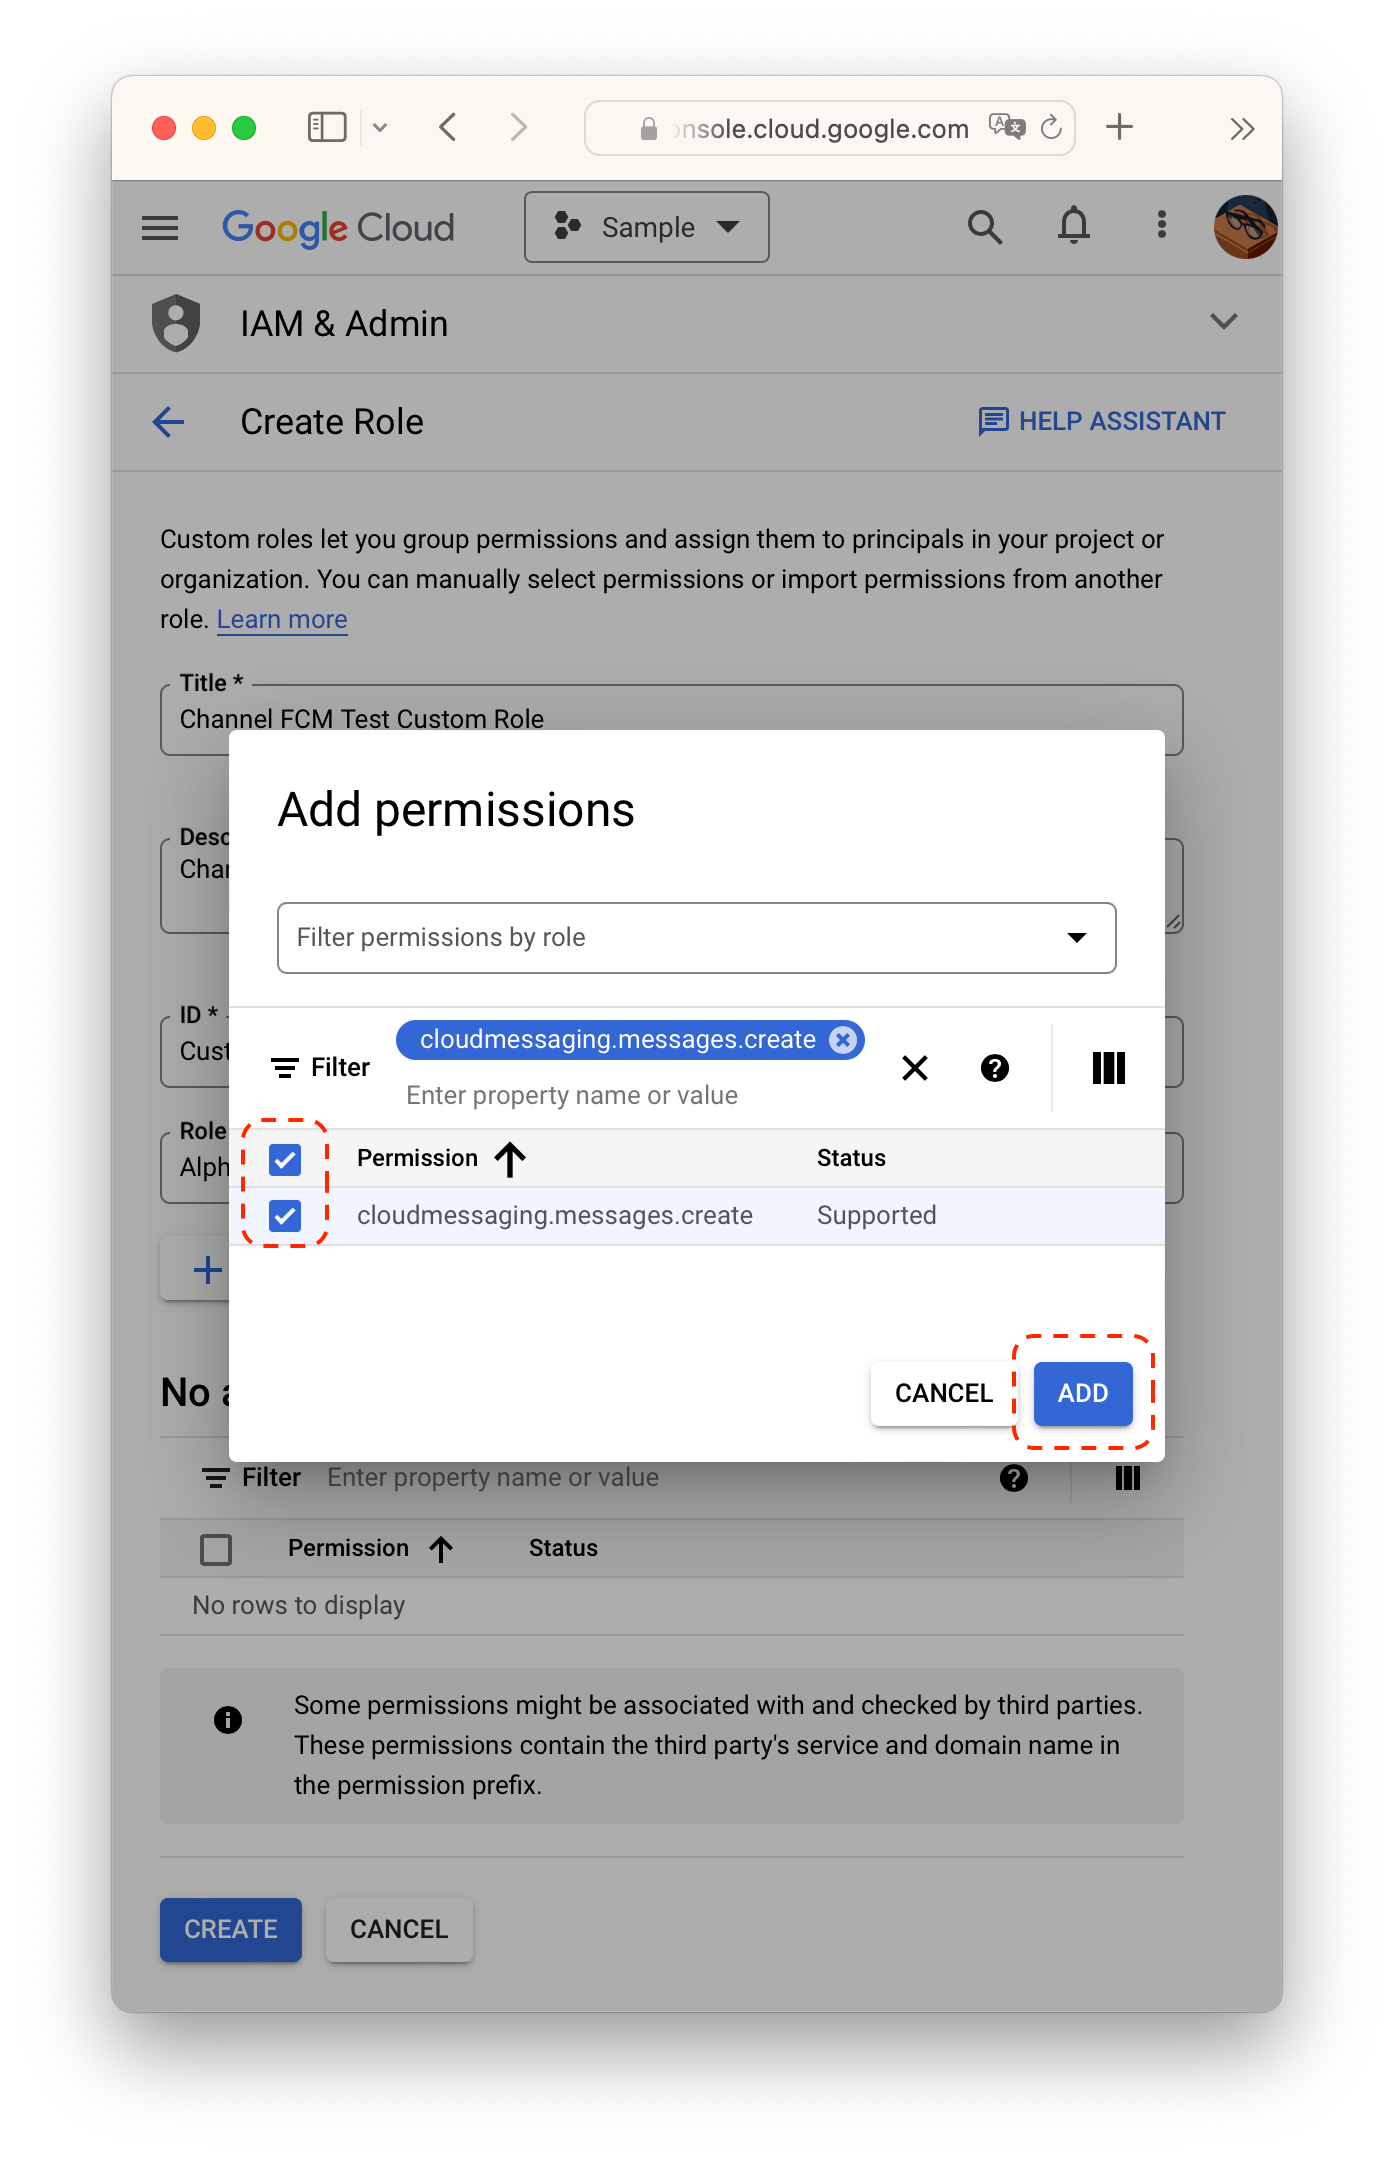
- cloudmessaging.messages.create 권한을 선택하여 추가한 후, 역할을 만듭니다. ‘역할을 기준으로 권한 필터링’(Filter permissions by role) 하는 곳에서 검색하지 않도록 주의합니다.
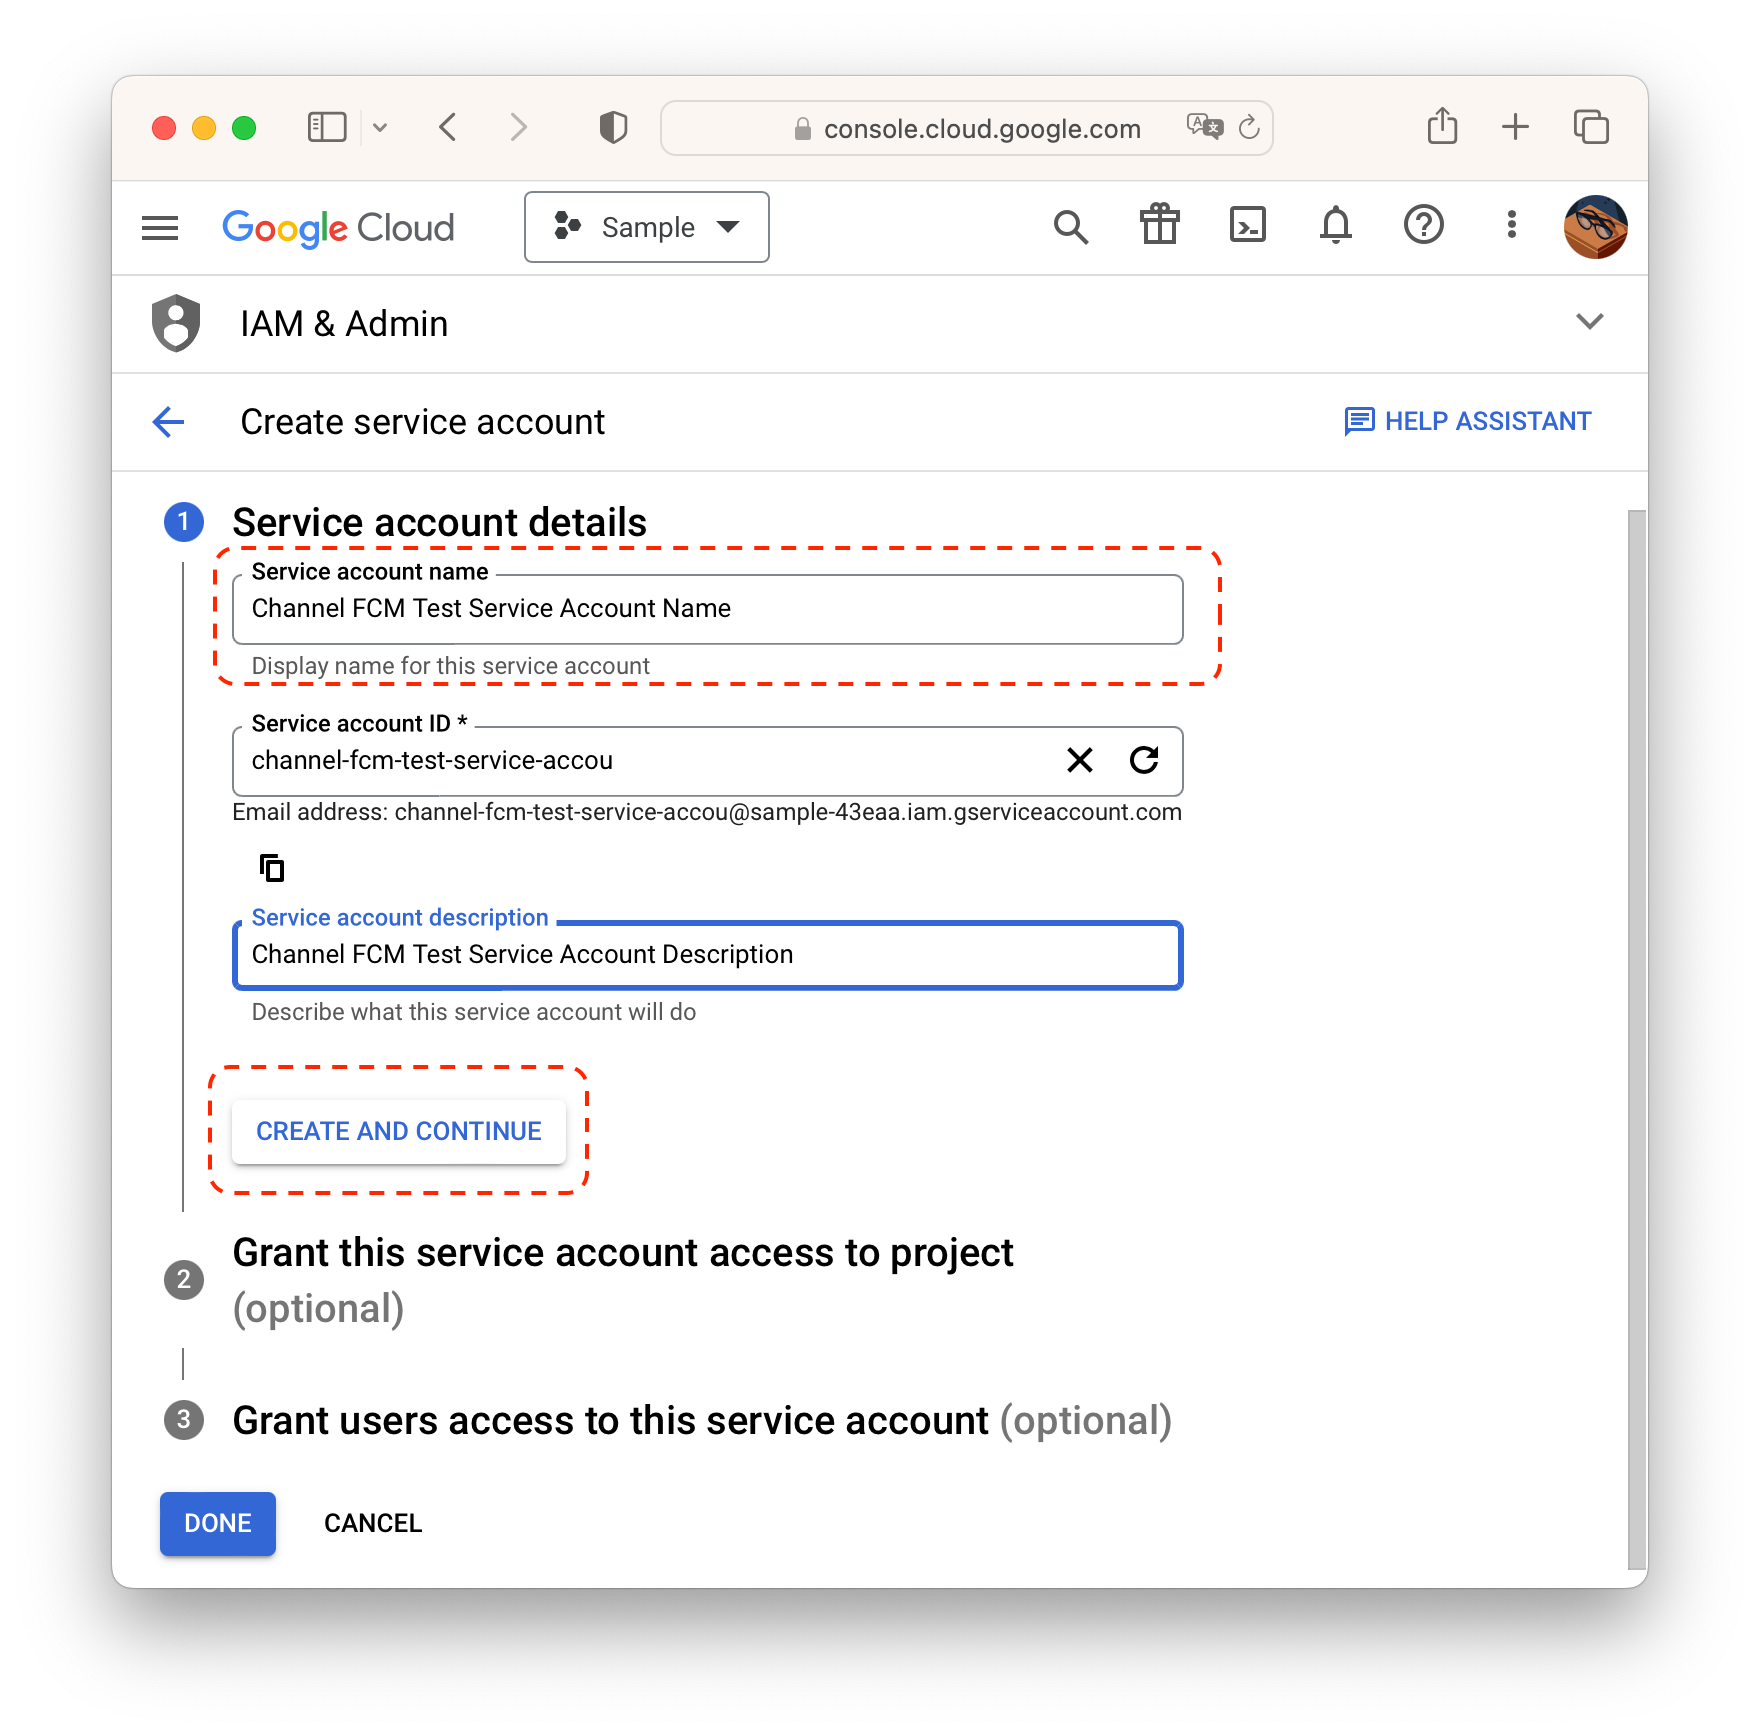
- 다시 맨 처음 화면으로 돌아와서, 서비스 계정 만들기(CREATE SERVICE ACCOUNT)를 클릭합니다.
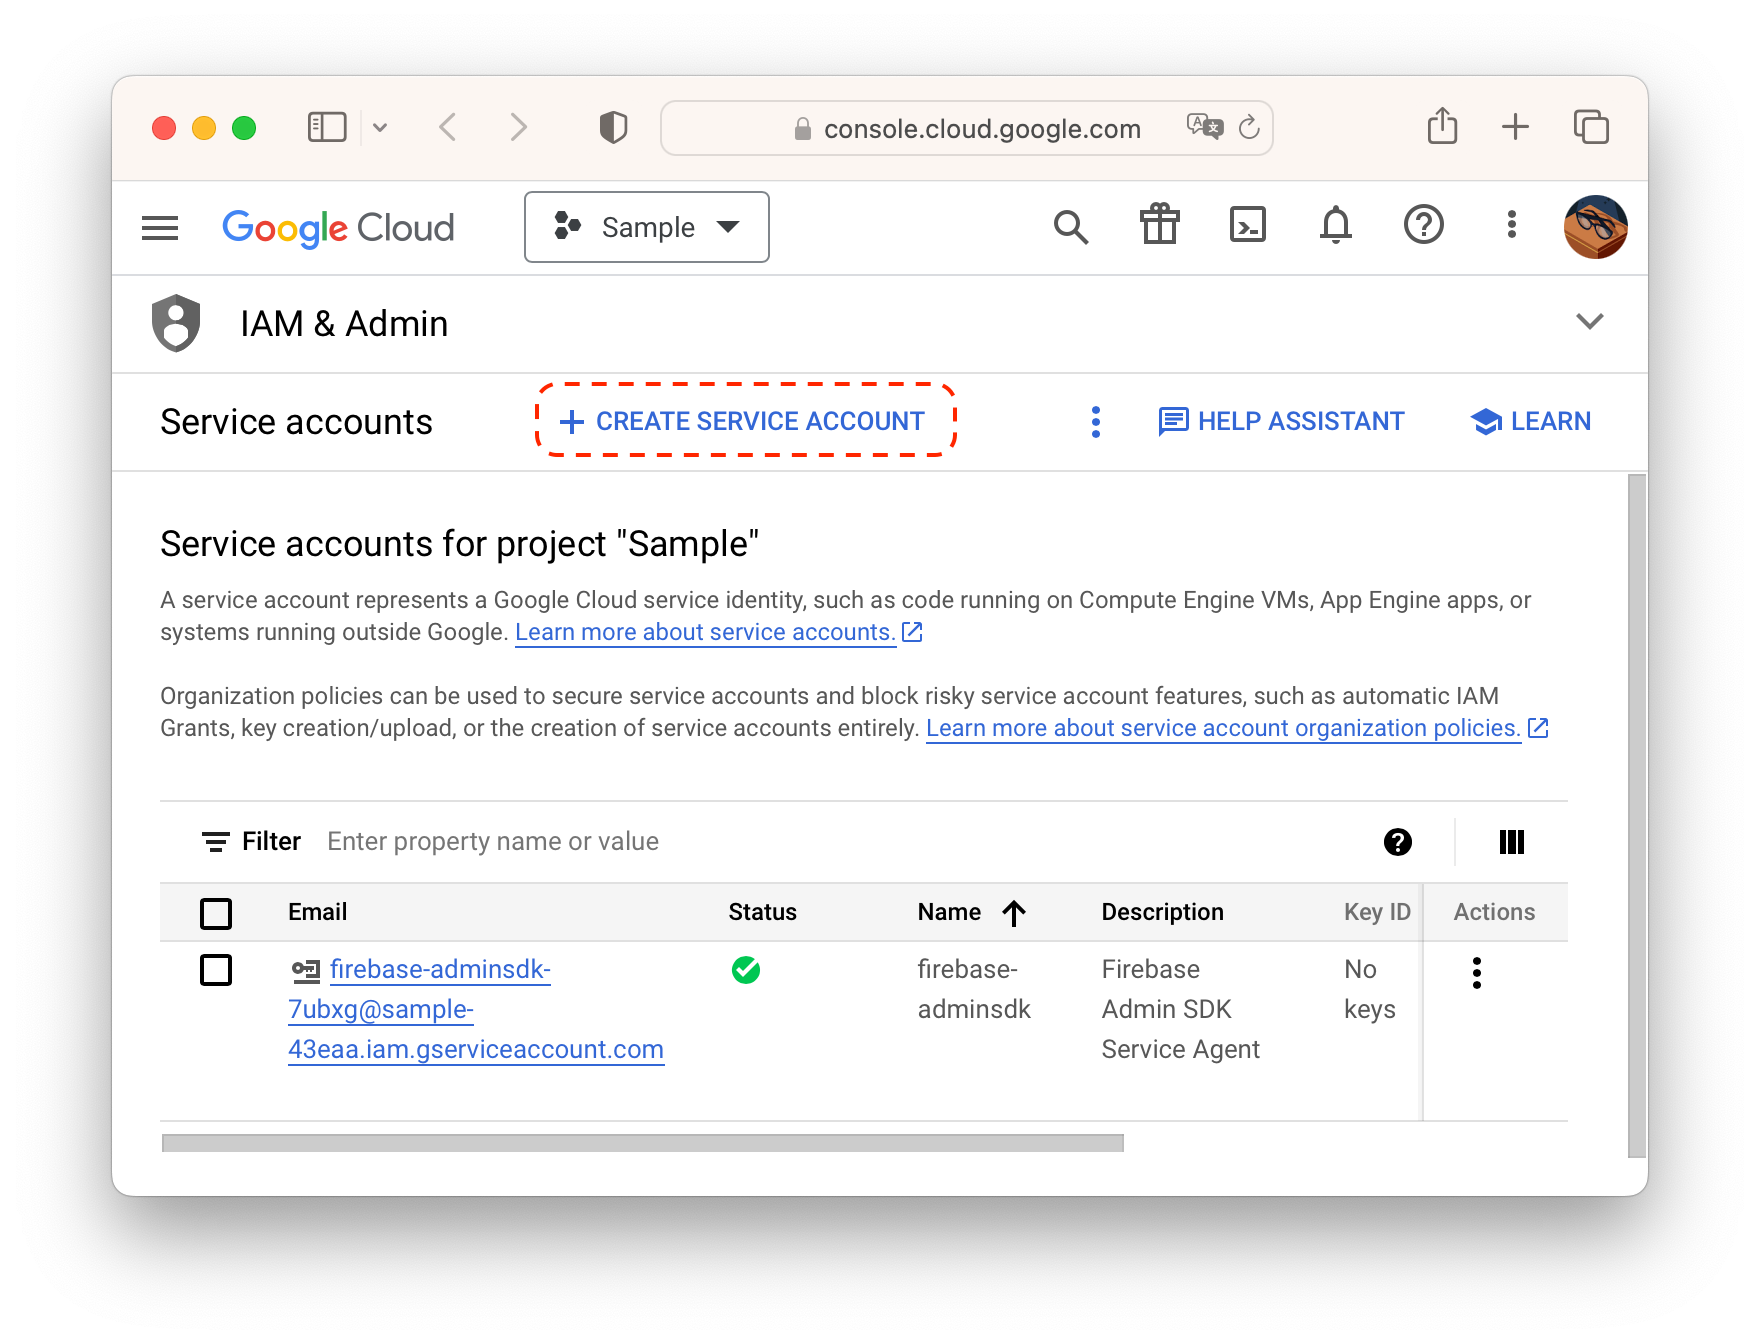
- 서비스 계정 세부정보를 채워넣고 만들고 계속하기(CREATE AND CONTINUE)를 클릭합니다.
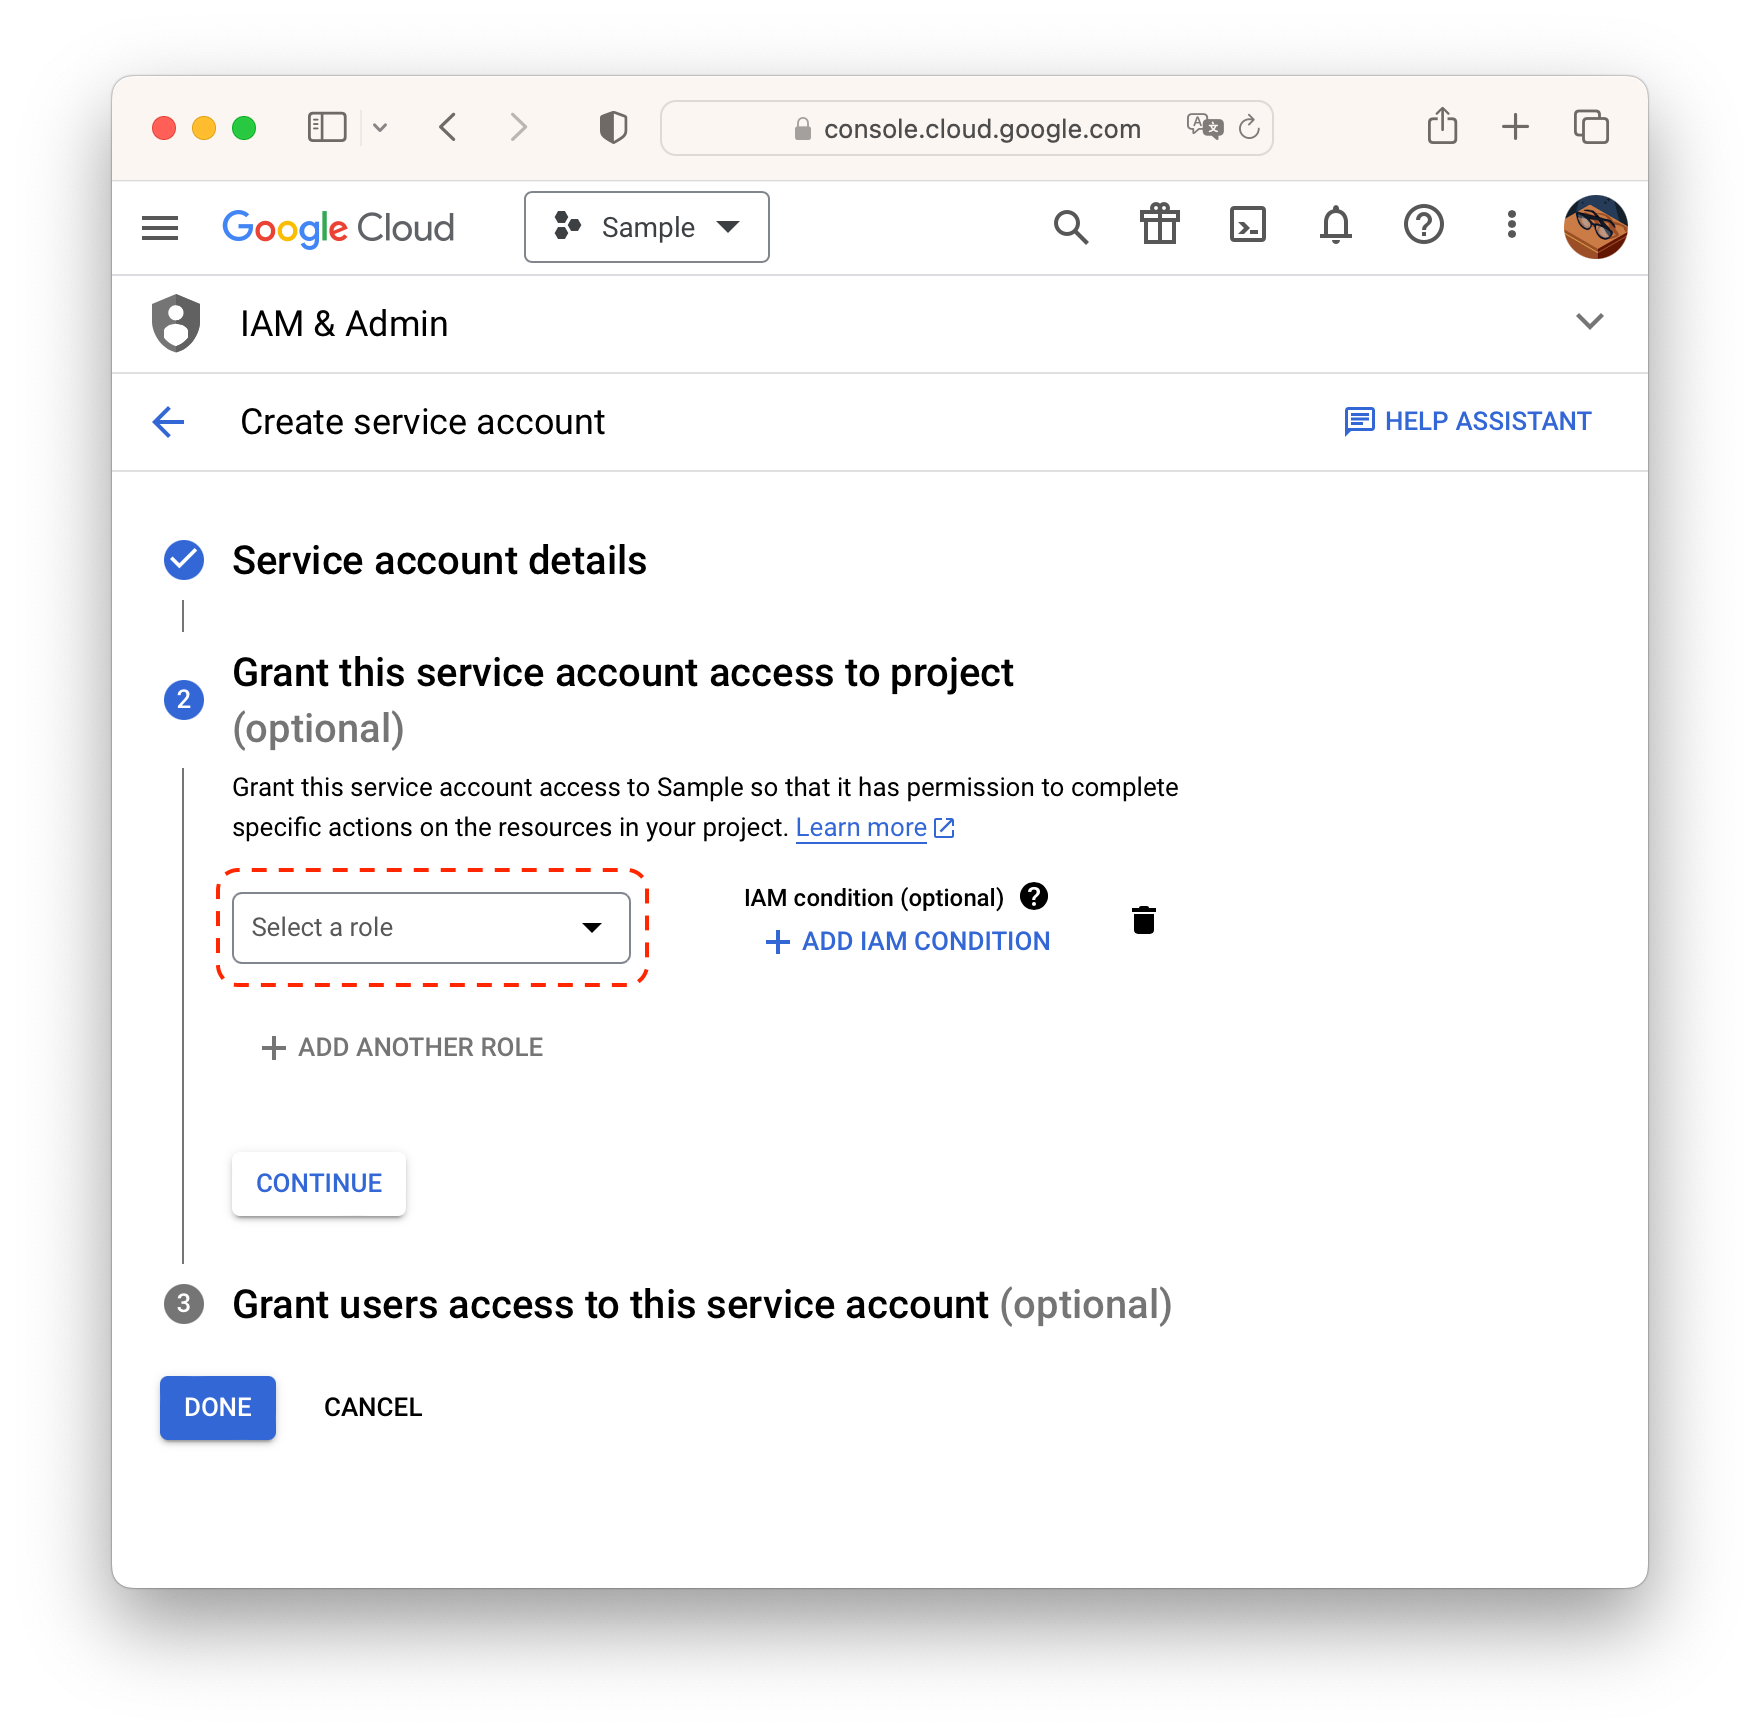
- 역할 선택(Select a role)을 클릭합니다.
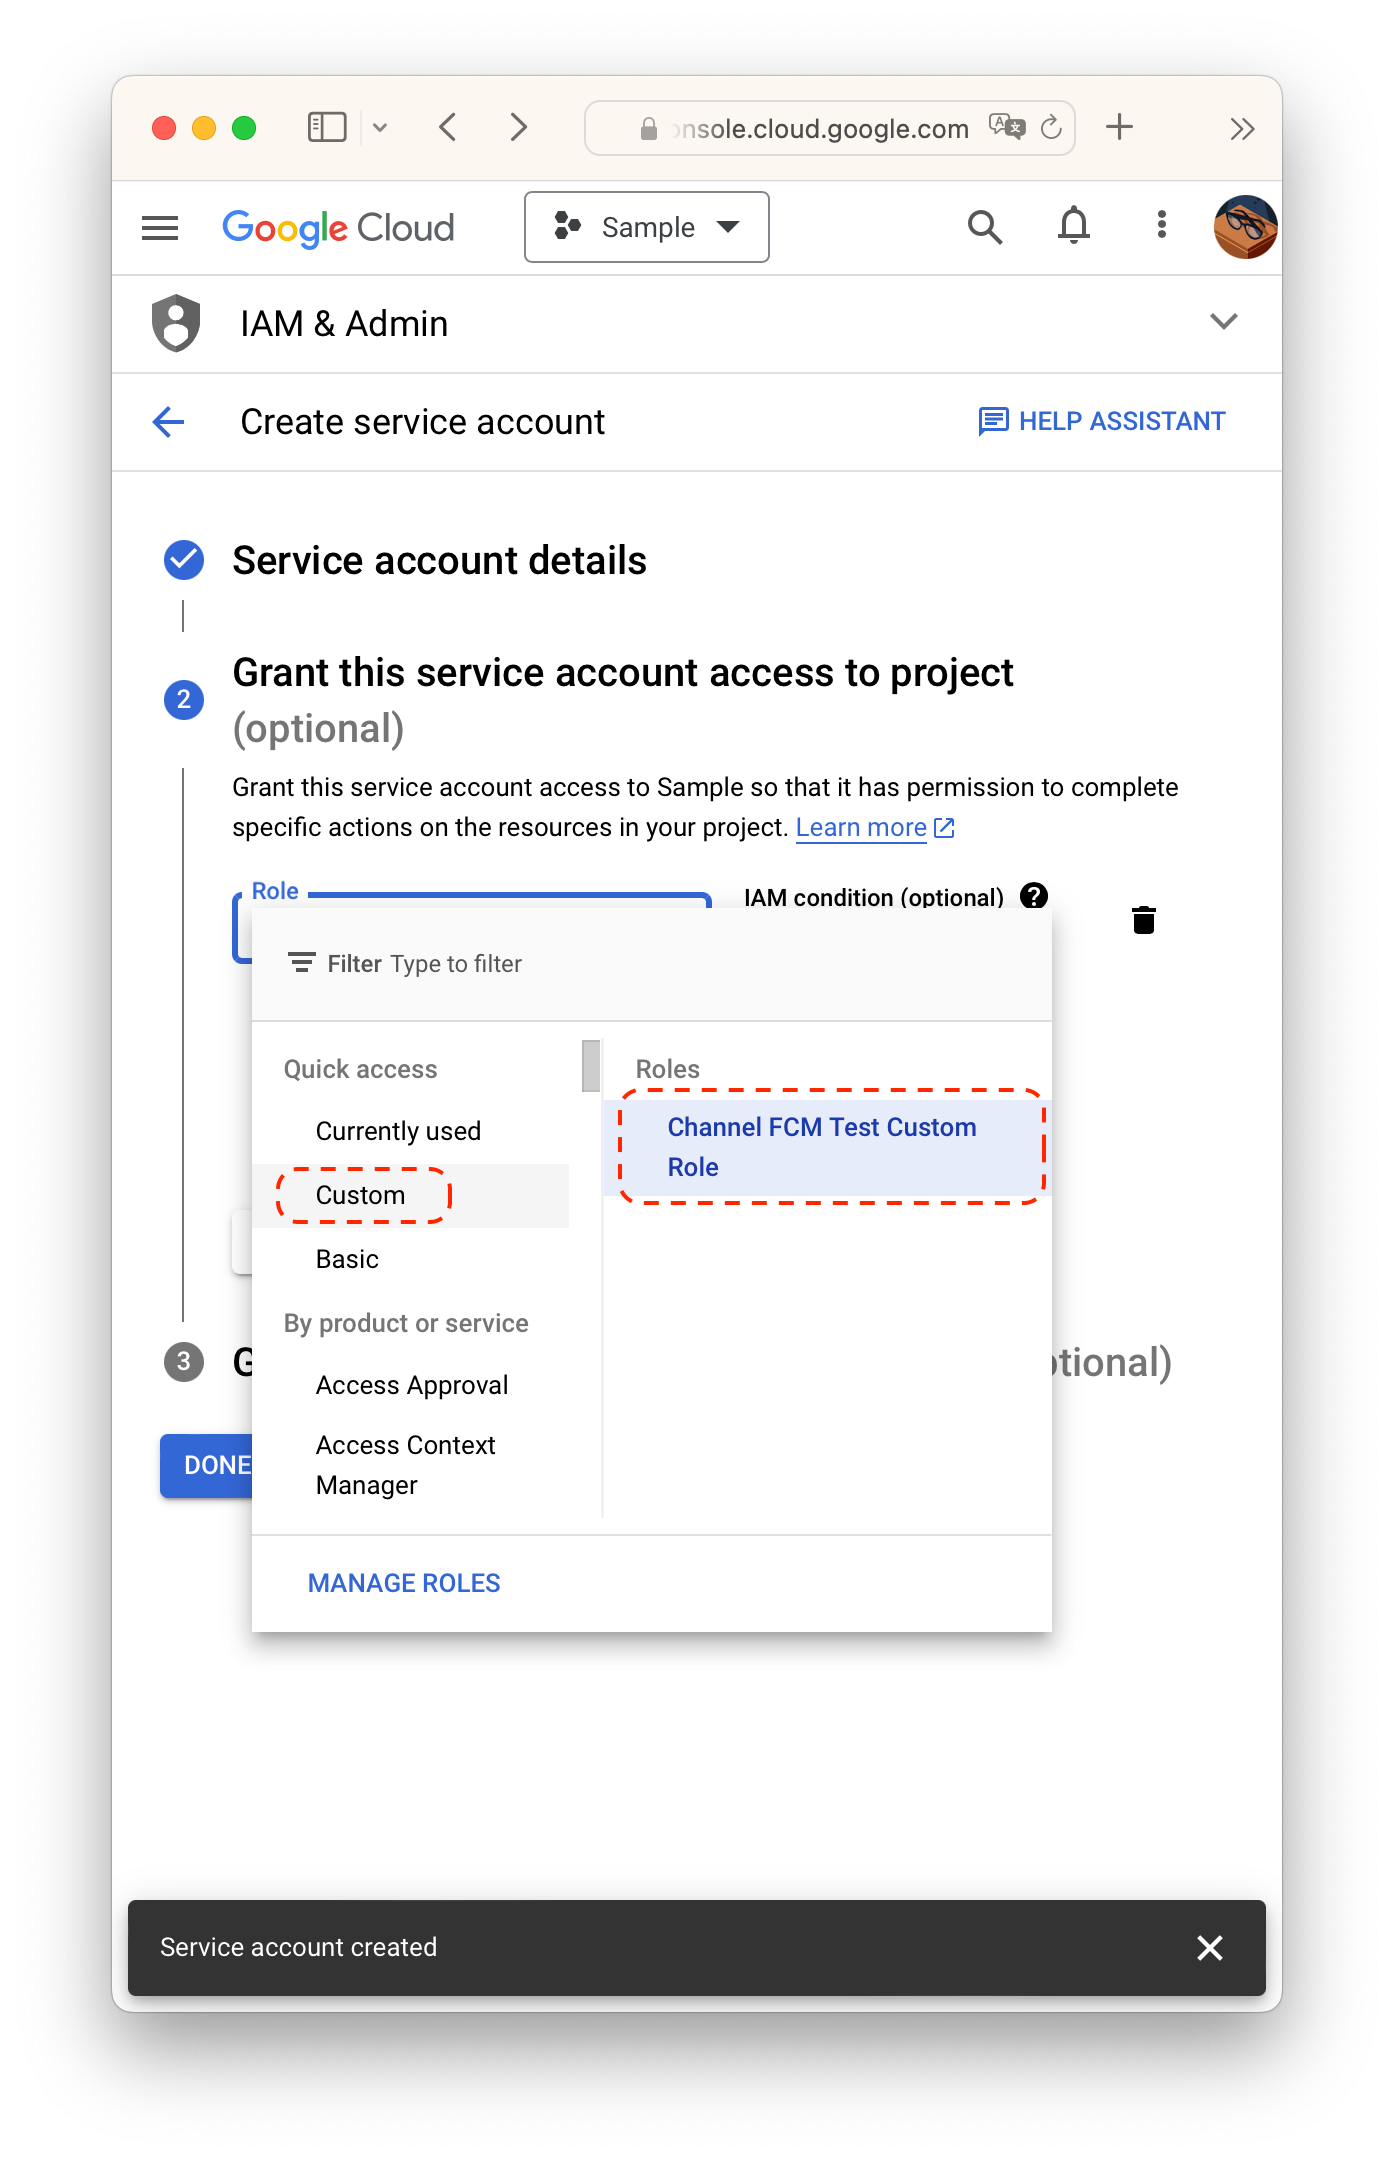
- 만든 커스텀 역할을 부여해서 서비스 계정을 완성합니다.
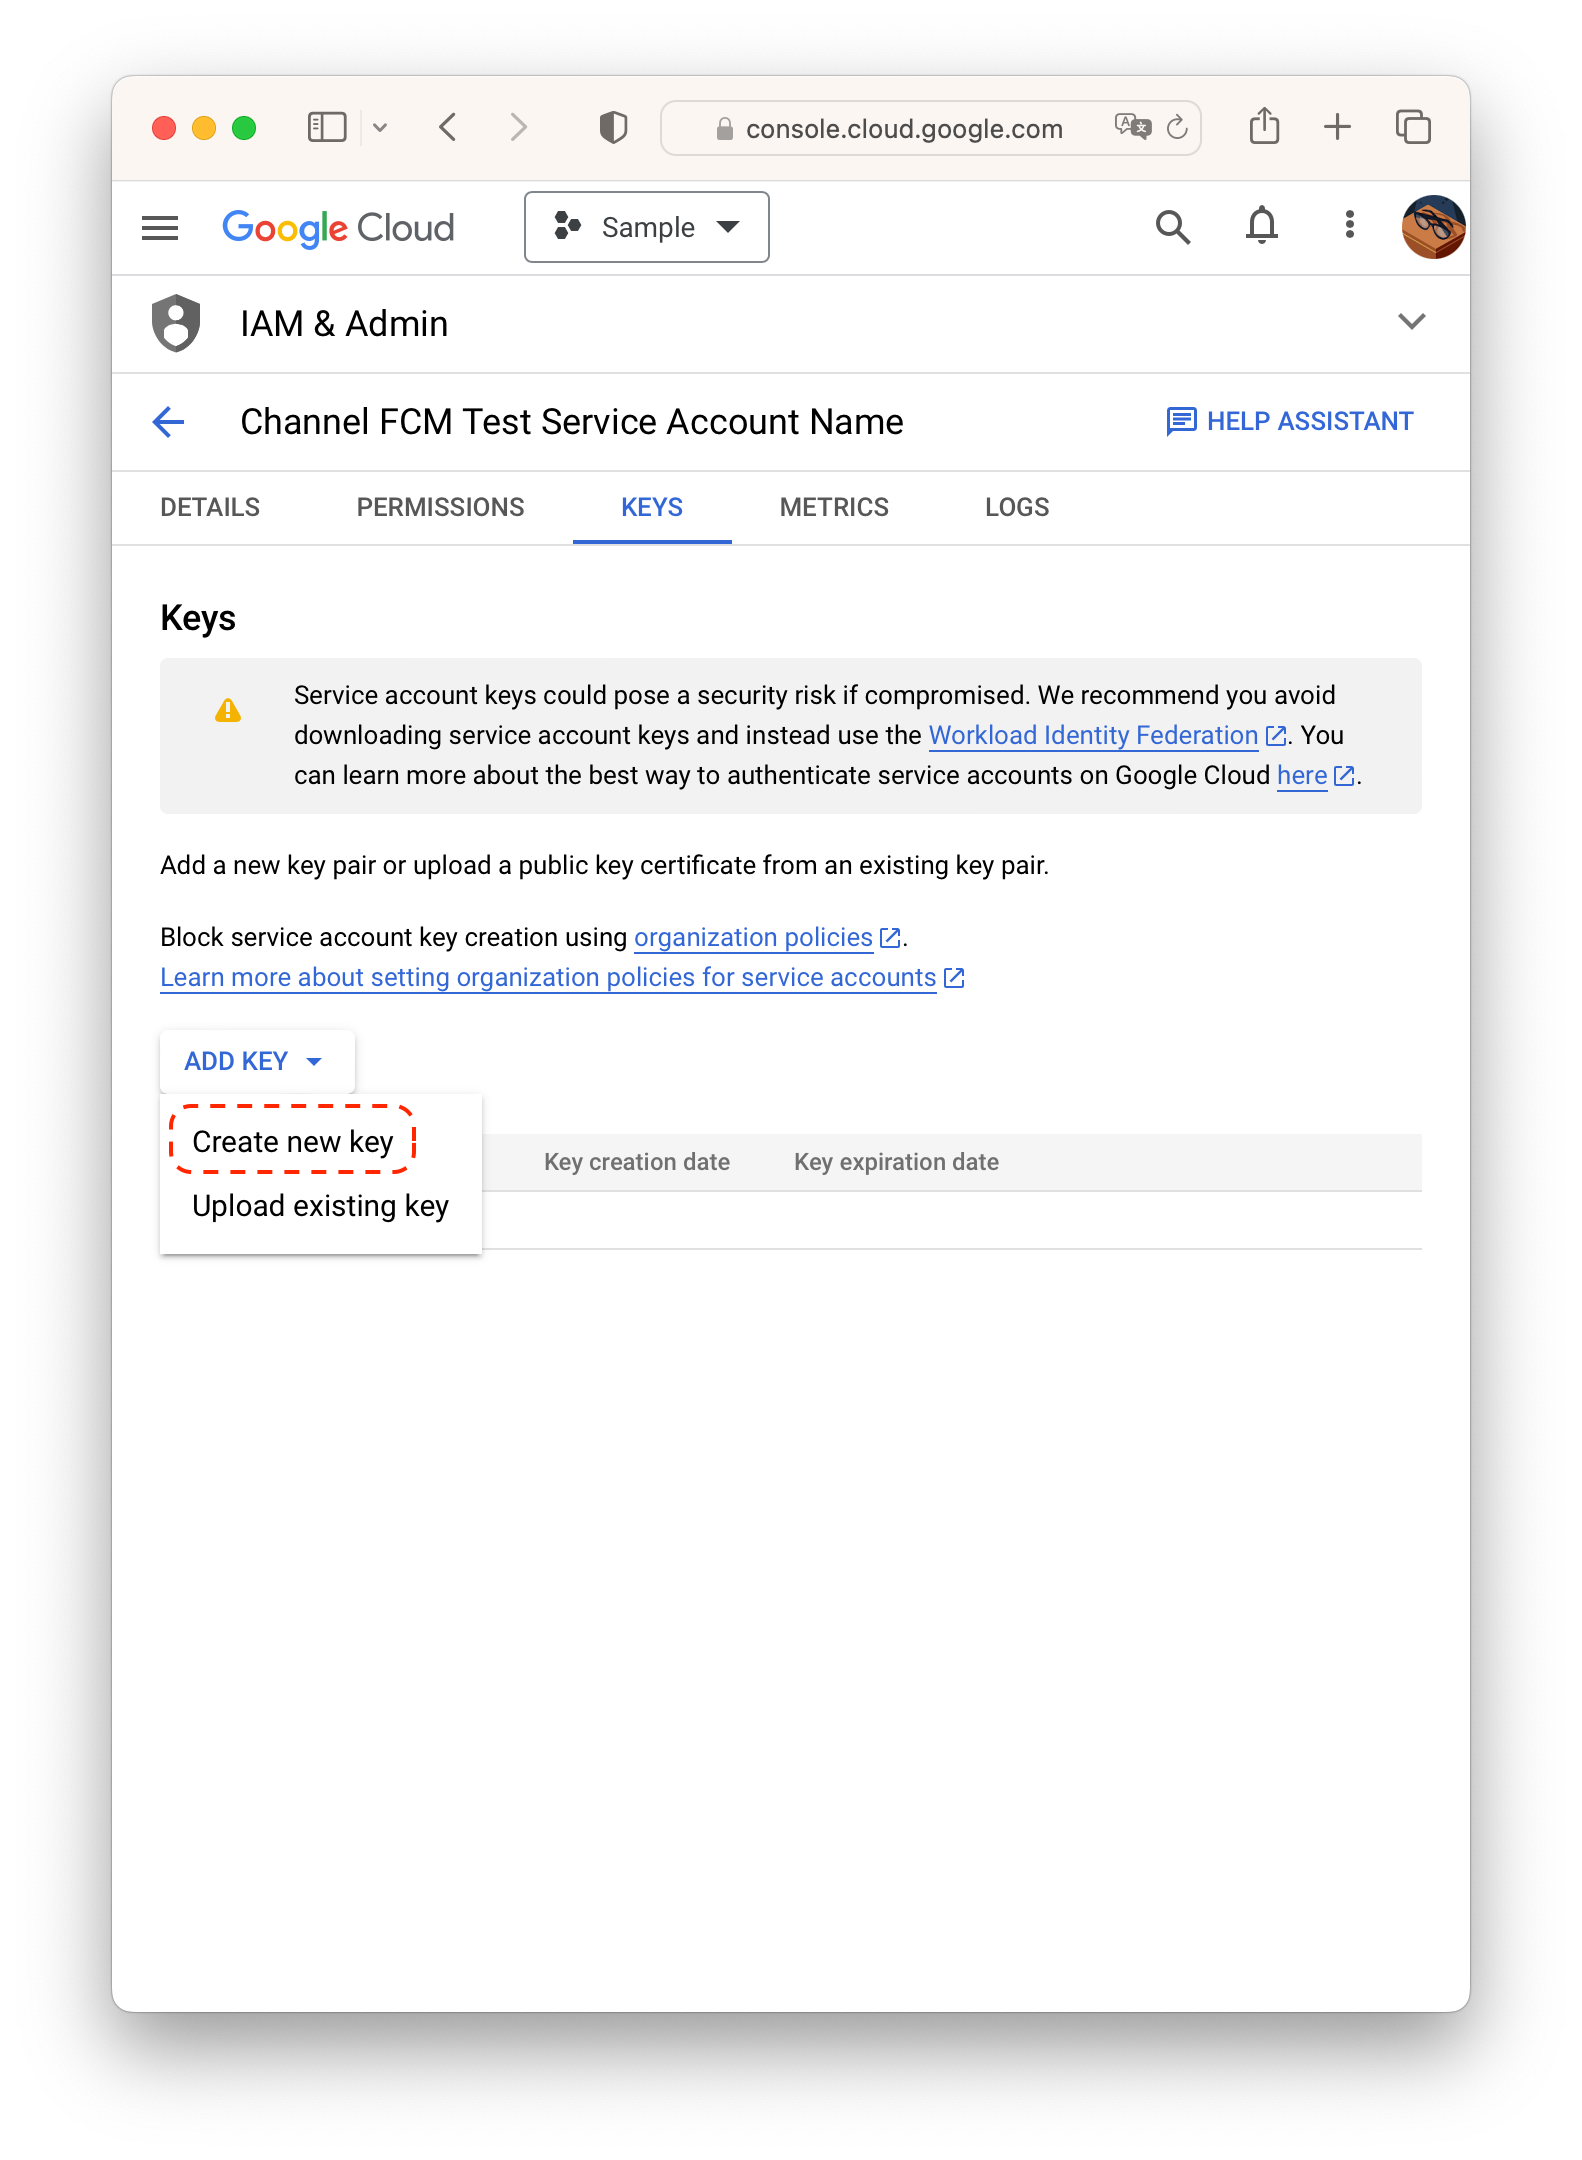
- 만든 서비스 계정의 키 관리(Manage keys)에 들어갑니다.
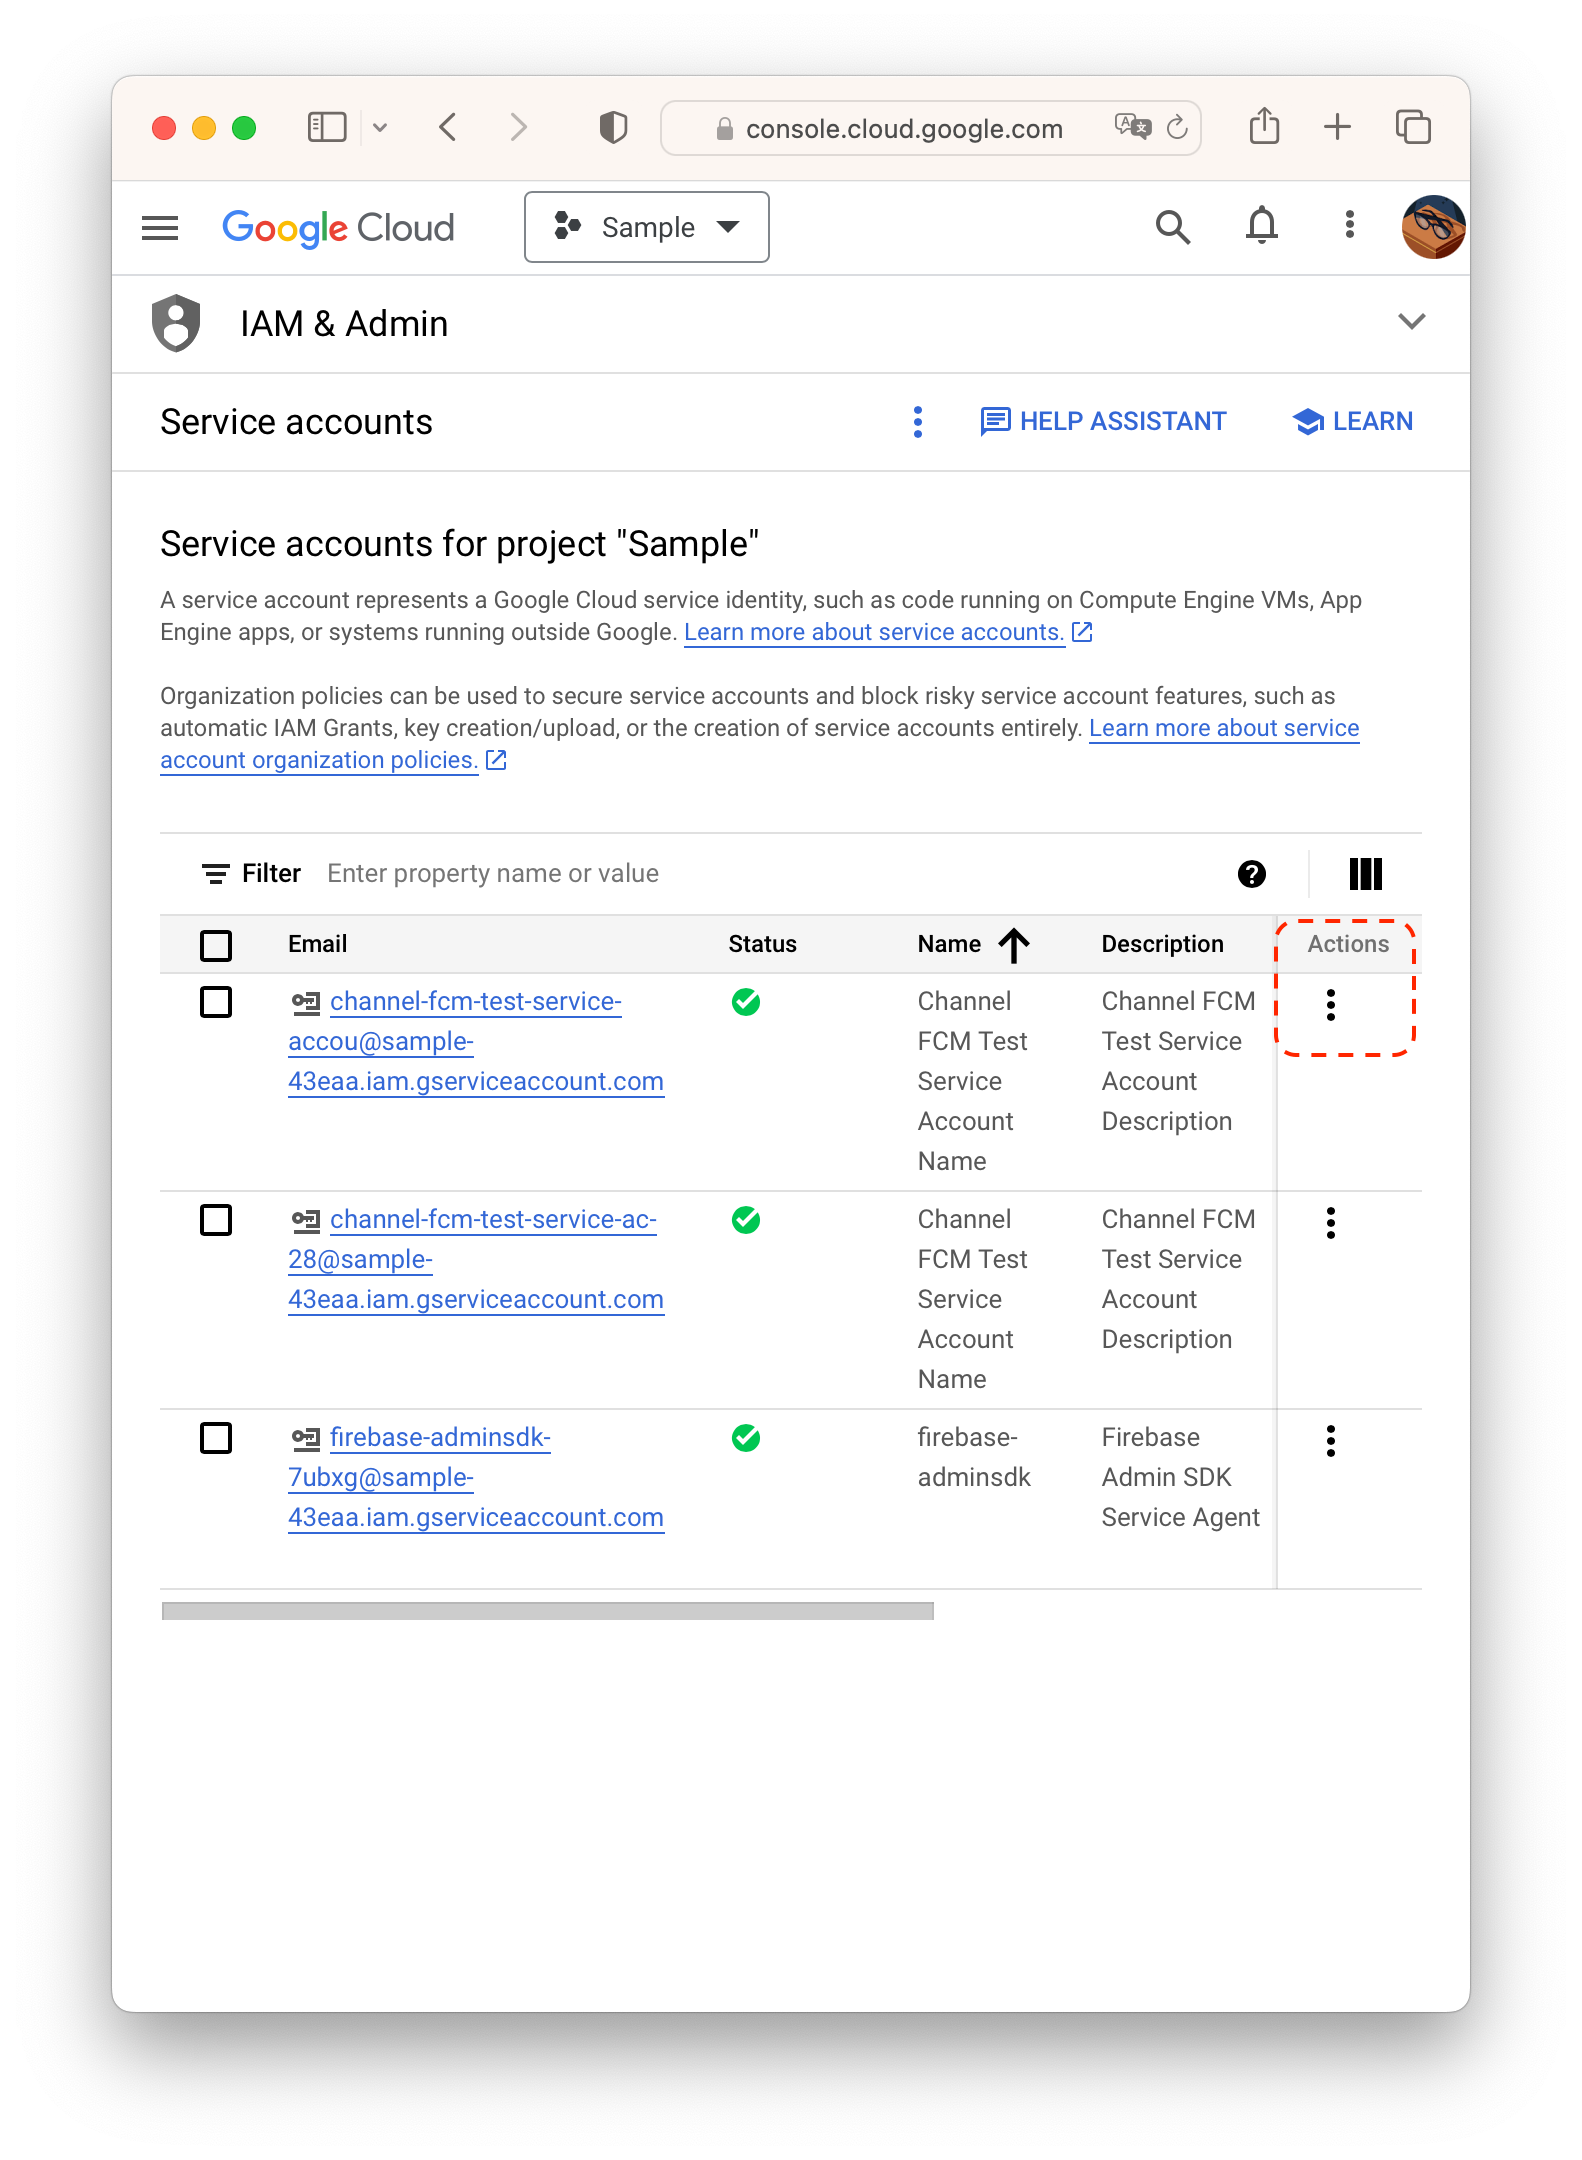
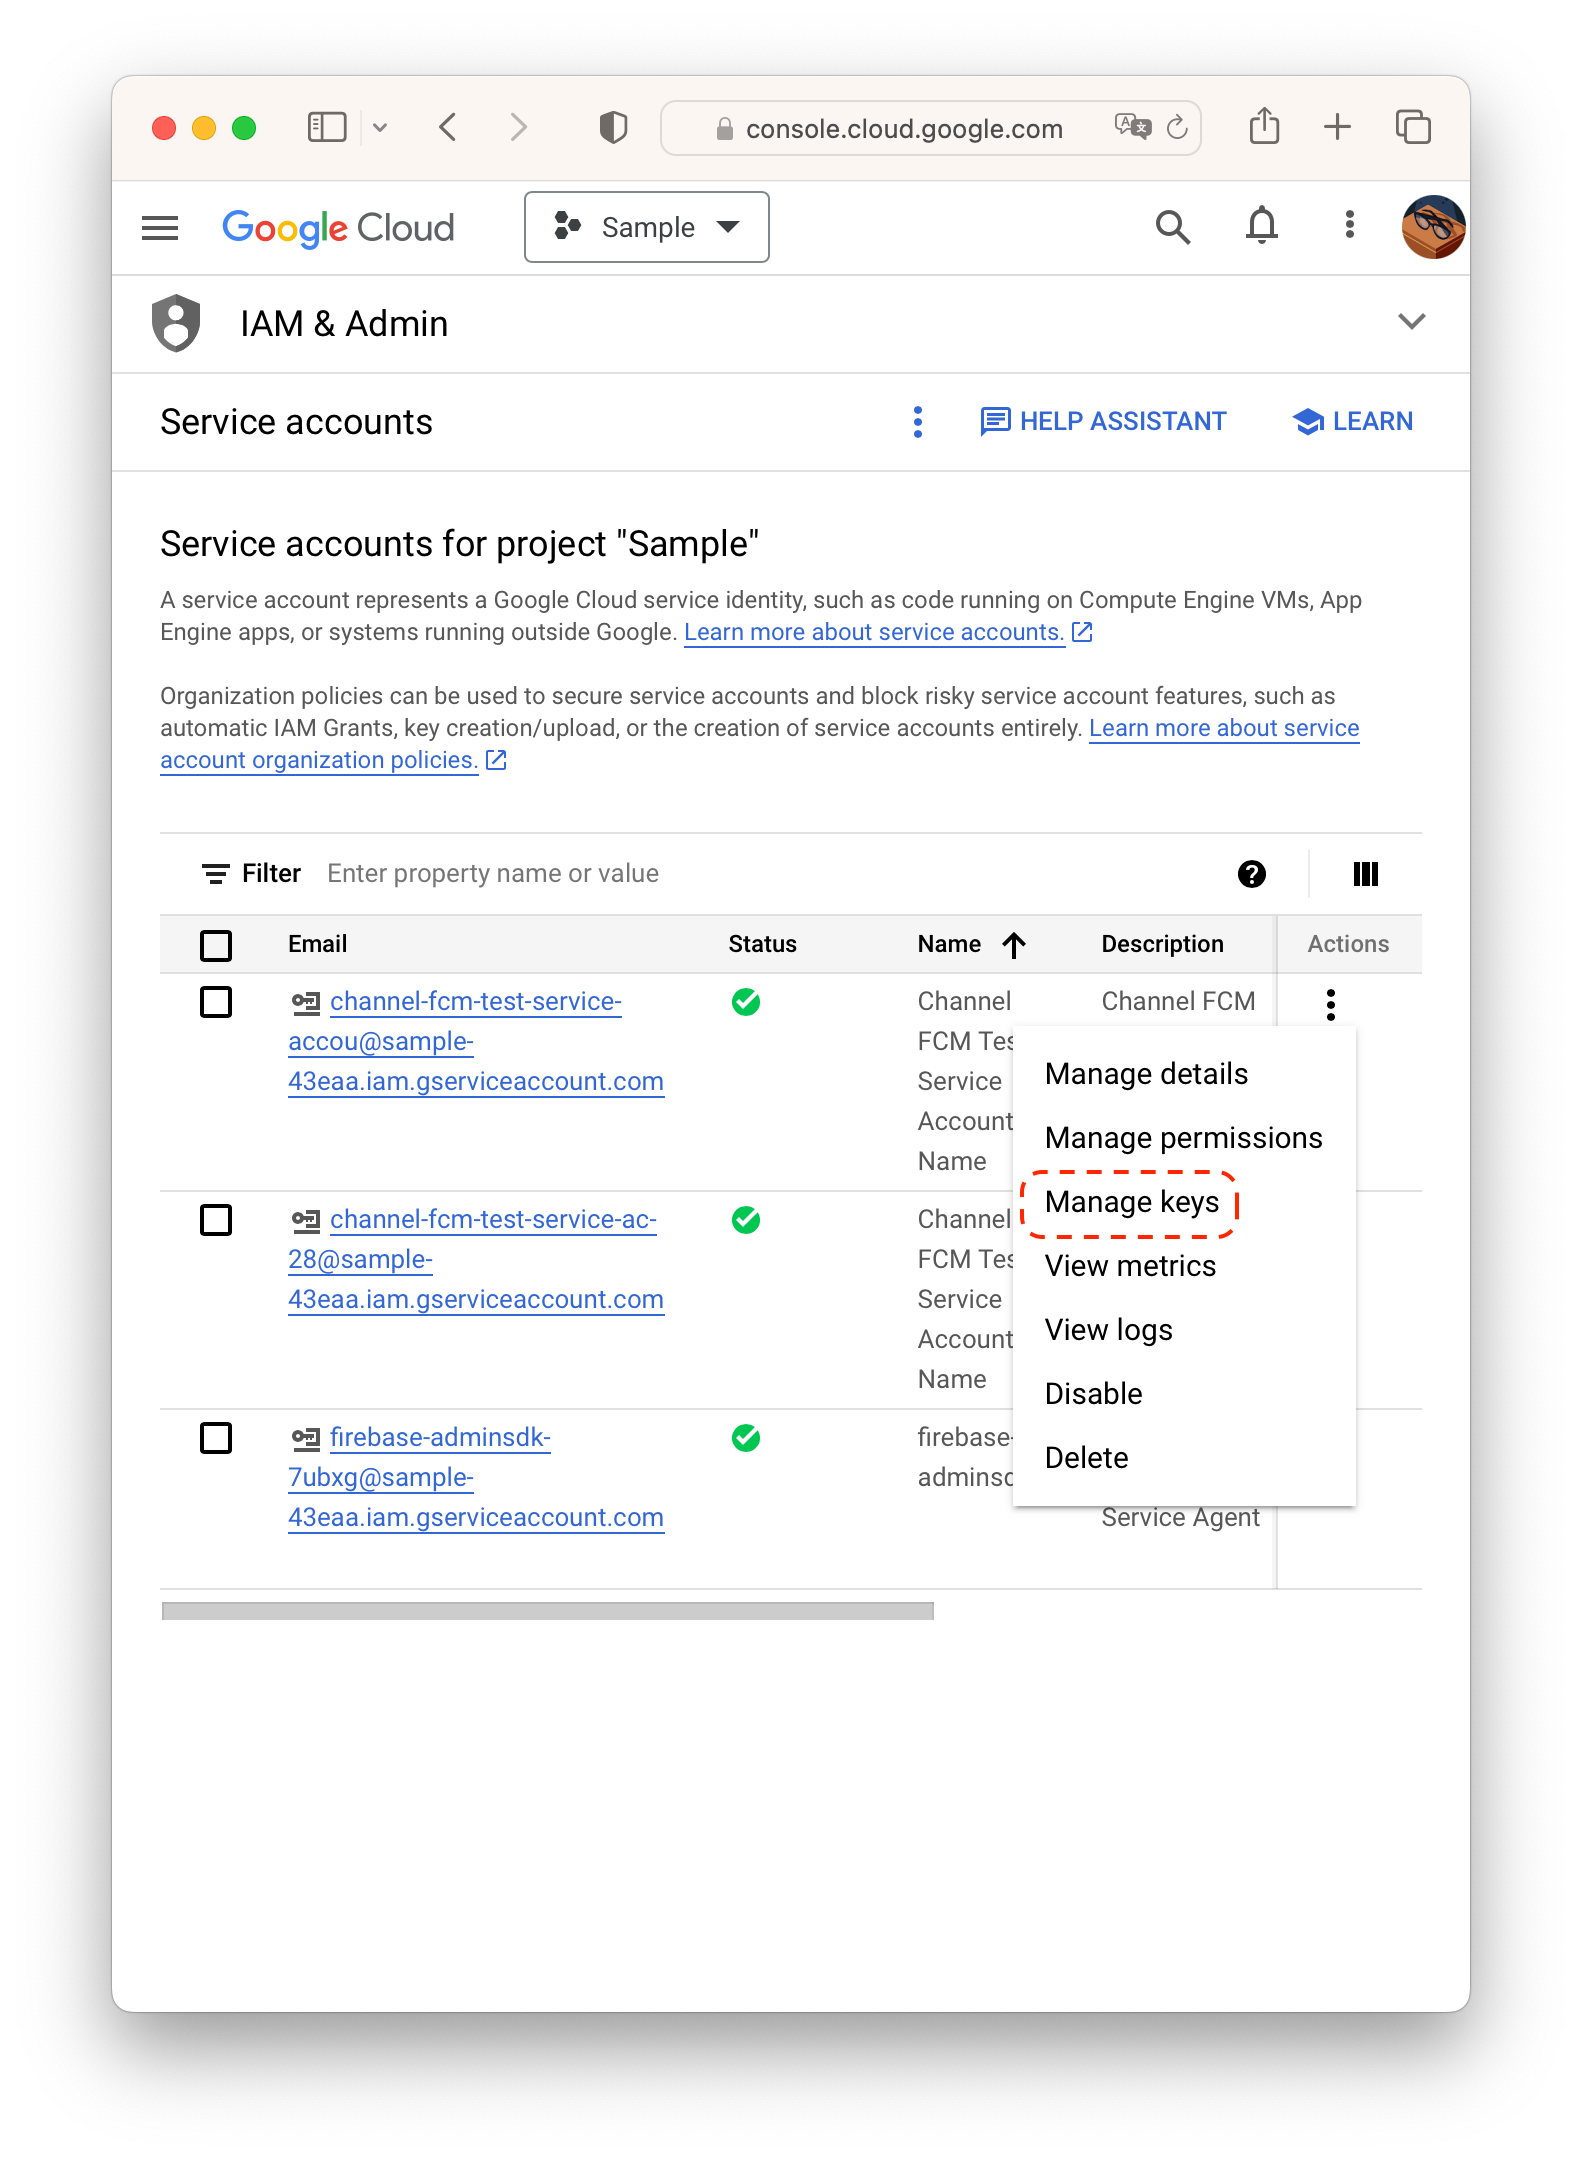
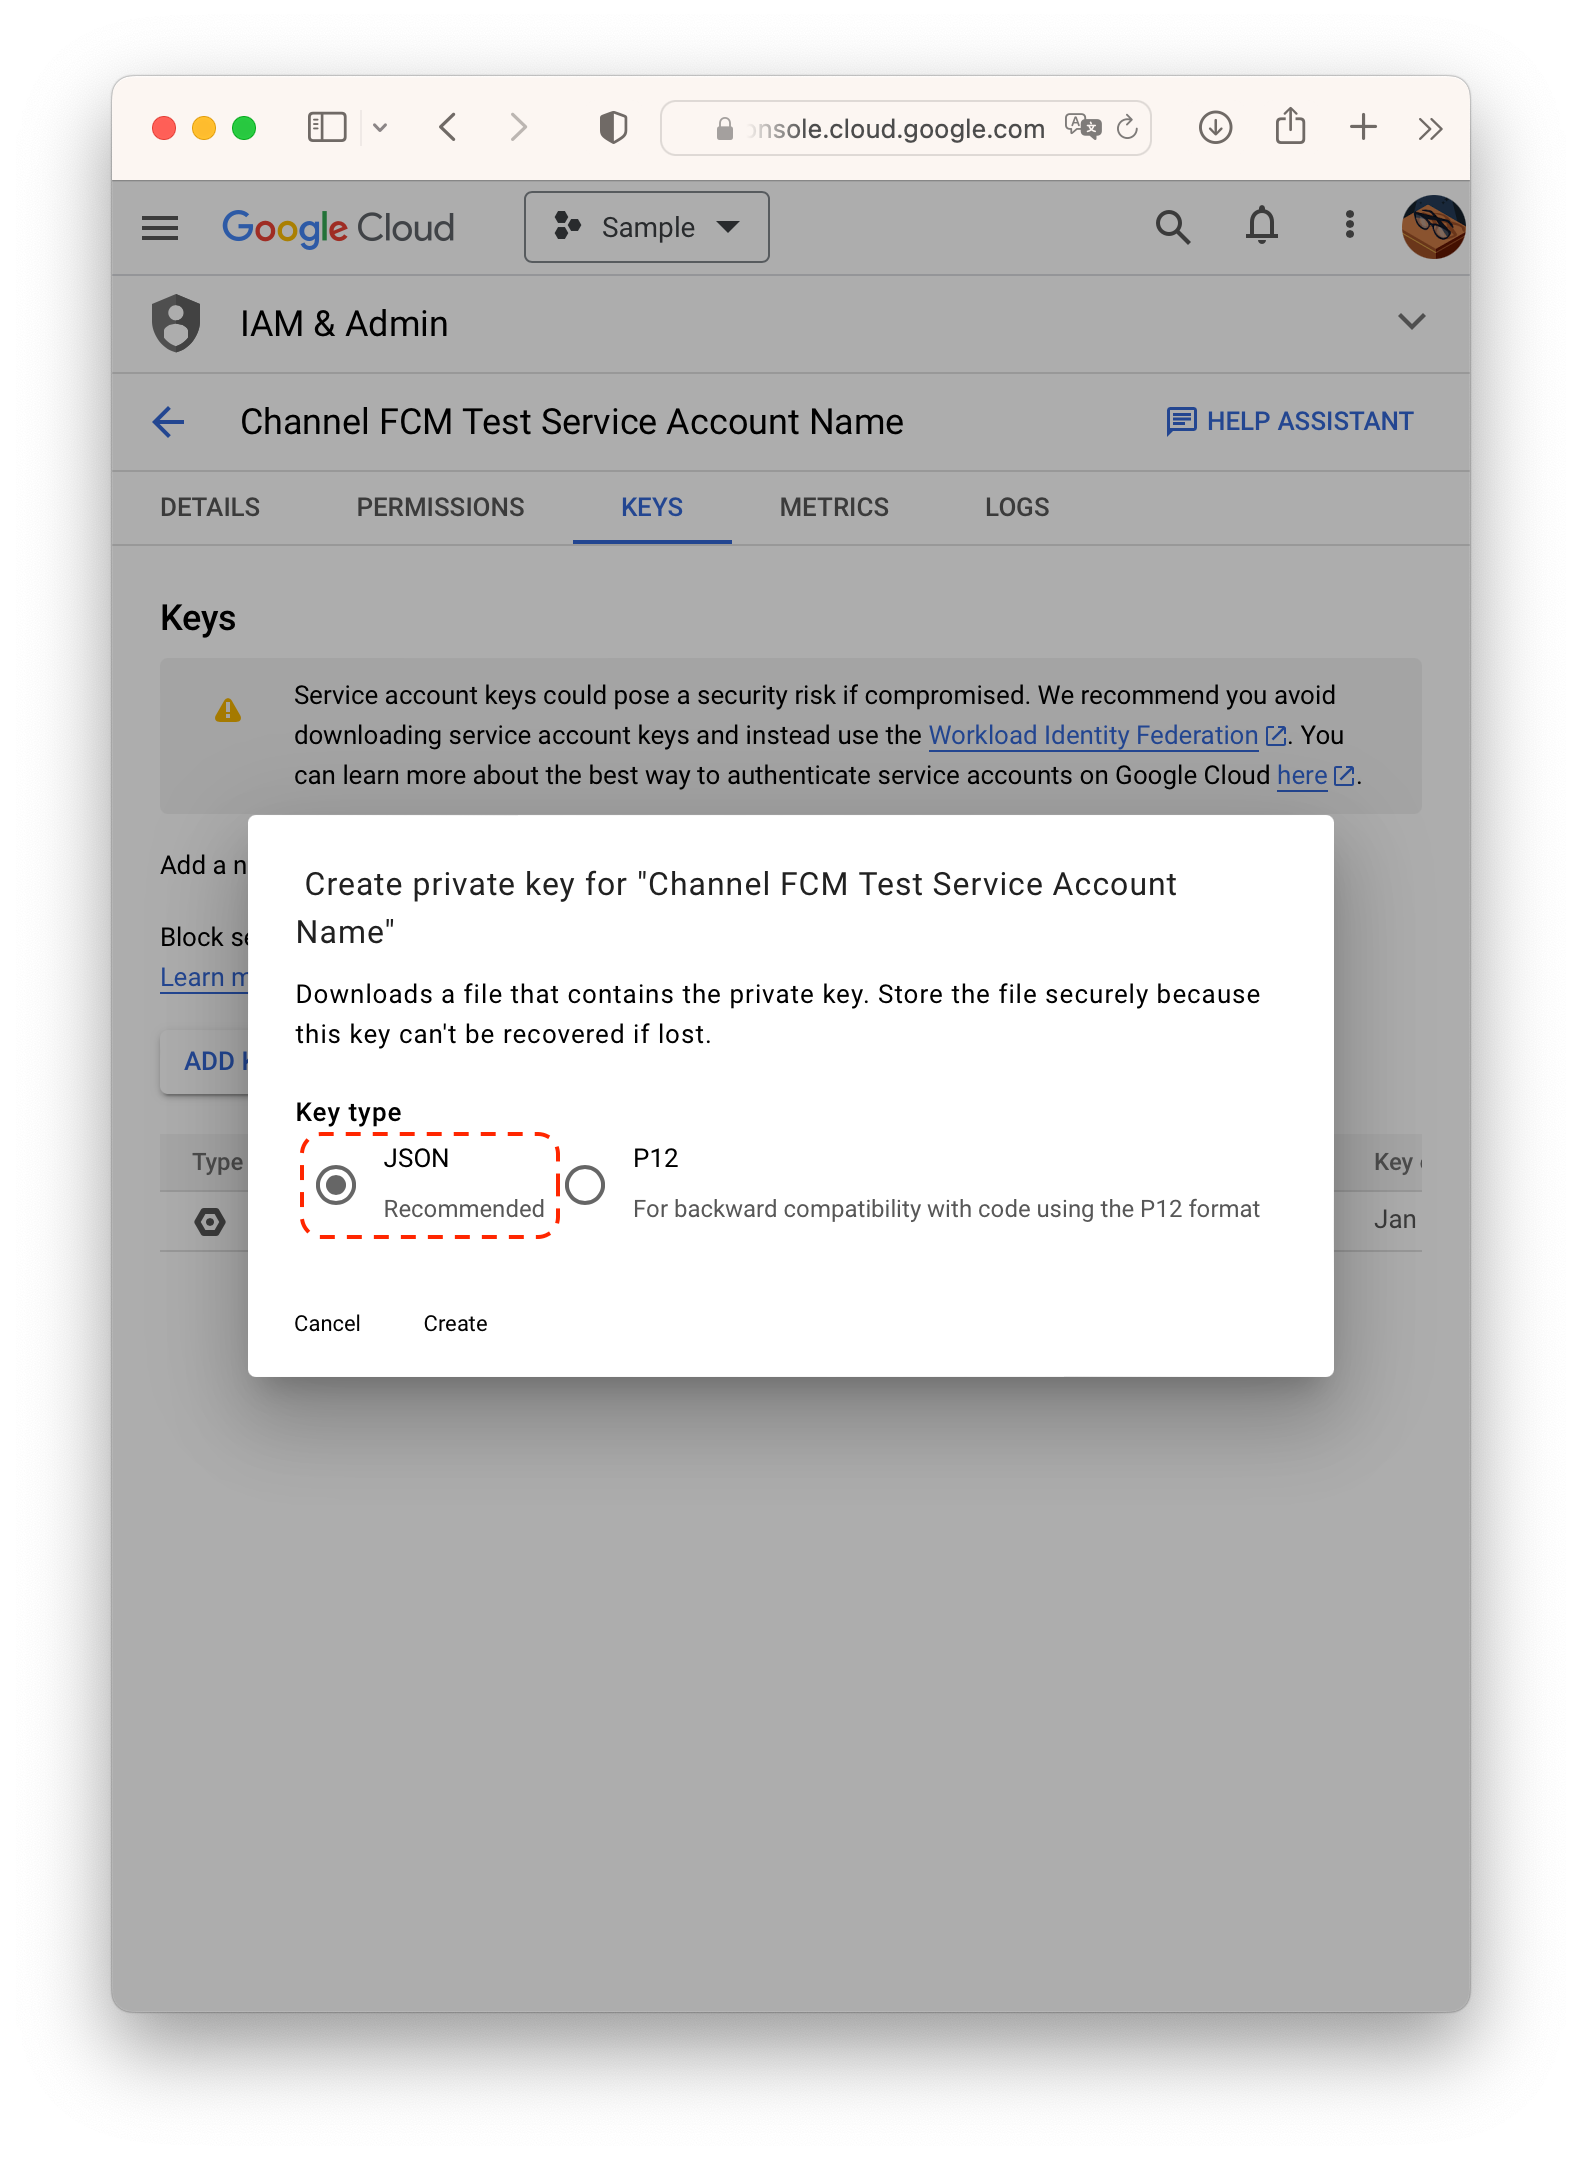
- 키 추가(ADD KEY)- 새 키 만들기(Create new key) - key 타입을 json으로 선택하여 키를 만듭니다.
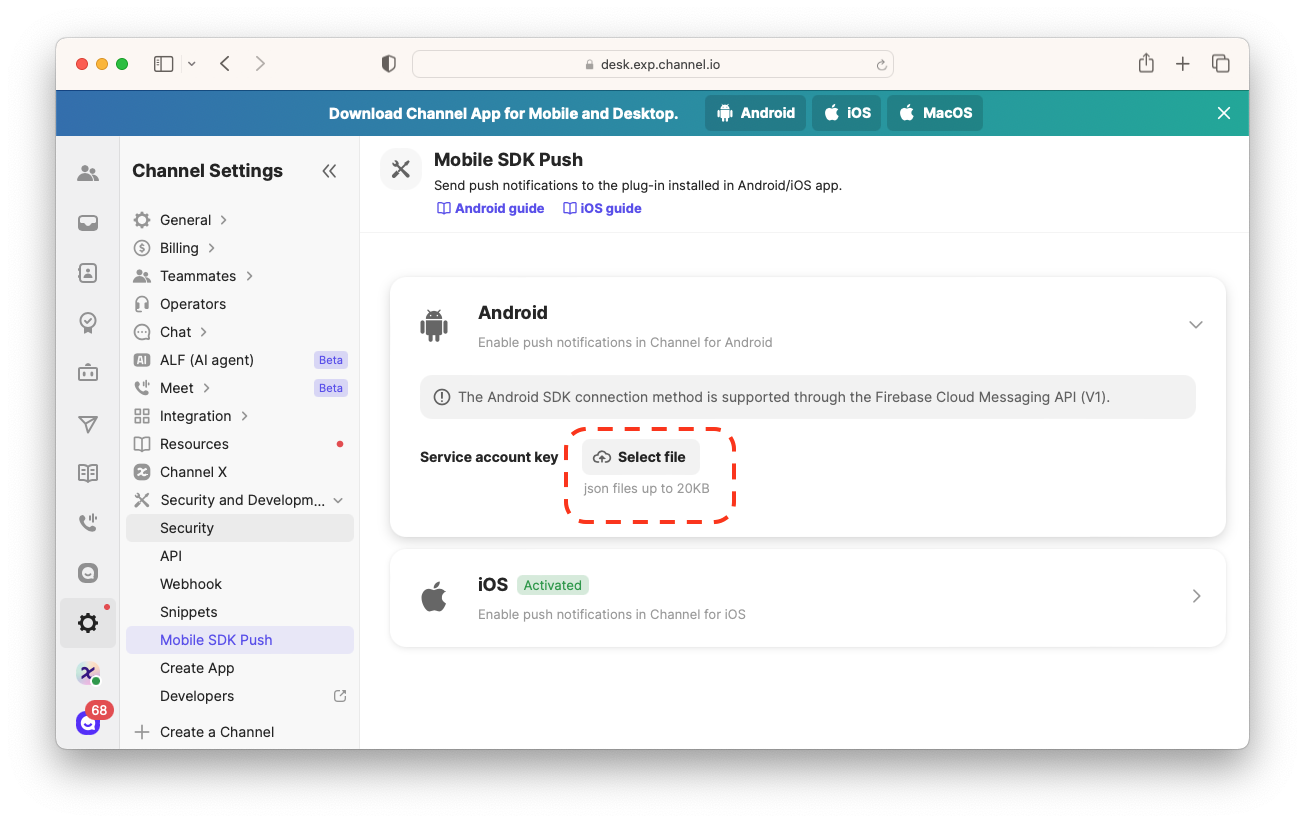
- 채널톡 데스크에서 설정 > 보안 및 개발 > 모바일 SDK 푸시 > 안드로이드를 클릭합니다.
- Select File을 눌러 key 파일을 업로드합니다.
Step 3. Firebase 프로젝트 연동하기
Background / Quit 상태일 때 메시지 전송
Background / Quit 상태에서 정상적으로 메시지를 받기 위해서는 FCM의 handler 등록 순서에 유의해야합니다. 공식 가이드 문서를 확인해주세요.
Firebase를 프로젝트에서 처음 사용하는 경우
Firebase를 프로젝트에서 기존에 사용하지 않고 있었다면 앱 모듈 단위 build.gradle에 아래 디펜던시를 추가해서 연동할 수 있습니다. io.channel:plugin-android-fcm 모듈은 자동으로 Firebase 서비스를 등록해 메시지를 처리합니다.
dependencies {
	implementation 'io.channel:plugin-android-fcm:$[version]'
}
Firebase를 이미 사용하고 있는 경우
이미 Firebase를 프로젝트에서 사용하고 있는 경우, 수동으로 채널톡 SDK에 Firebase 메시지가 왔음을 알려야 합니다. ChannelIO.initPushToken(String)을 호출해 FCM 토큰을 SDK로 전달합니다.
import firebase from 'react-native-firebase';
import { ChannelIO } from 'react-native-channel-plugin';

componentDidMount() {
  this.onRefreshListener = firebase.messaging().onTokenRefresh(fcmToken => {
     ChannelIO.initPushToken(fcmToken);
  });
}

componentWillUnmount() {
  this.onRefreshListener();
}
그 다음 Firebase 메시지가 도착했을 때 SDK가 이를 알 수 있도록 합니다.
import type { RemoteMessage } from 'react-native-firebase';
import { ChannelIO } from 'react-native-channel-plugin';

componentDidMount() {
  this.mListener = firebase.messaging().onMessage((message: RemoteMessage) => {
    ChannelIO.isChannelPushNotification(message.data)).then((result) => {
      if (result) {
        ChannelIO.receivePushNotification(message.data).then((_) => { })
      } else {
        // TODO : Your FCM code
      }
    }
  });
}

componentWillUnmount() {
  this.mListener();
}
// Register background handler
messaging().setBackgroundMessageHandler(async remoteMessage => {
    ChannelIO.isChannelPushNotification(message.data)).then((result) => {
      if (result) {
        ChannelIO.receivePushNotification(message.data).then((_) => { })
      } else {
        // TODO : Your FCM code
      }
    }
});
마지막으로 사용자가 알림을 눌렀을 때 해당 채팅으로 가게 하고 싶다면 App.js의 componentDidMount() 마지막 줄에 다음과 같은 코드를 추가해야 합니다.
import { ChannelIO } from 'react-native-channel-plugin';

componentDidMount() {
    ChannelIO.hasStoredPushNotification().then((result) => {
    if (result) {
      ChannelIO.openStoredPushNotification()
    }
  })
}